

Course episodes / unit 02
Summary
On-page SEO structures each page so people and search engines understand it at a glance. A front-loaded title of about 50–60 characters, one clear H1 with ordered sections, compressed WebP or AVIF images with real alt text, and descriptive internal links make the topic obvious, help Google crawl the page, and turn search visitors into paying customers.

Unit 02 // Workstation
Rewrite the title: [Keyword] - [Proof] | [Brand]
- 02 Tool
- SERPsim (serpsim.com, free)
- 04 Where to edit
- Products (or Pages / Collections) → open the item → Search engine listing → Edit → Page title.
- 04 Where to save
- Save (top right).
- 05 Verify
- Open the live page → View Page Source (Ctrl+U) → search for the tag. Google can take days or weeks to show the change, and may still rewrite it.
- Pass
- The full title shows in the preview with no trailing “...”.
- Fail
- The title is cut off with “...” and the brand name is hidden.
Episode 2 of the free Zero to Revenue SEO course. Previous: Episode 1, How Google Actually Works (/blog/zero-to-revenue-seo-how-google-works). Next: Episode 3, Programmatic Scaling (/blog/zero-to-revenue-seo-programmatic-scaling).
In Episode 1, we demolished the ₹50,000/month agency illusion and established how Googlebot crawls, indexes, and stores web pages in its digital library. But once Googlebot knocks on your front door, what does it actually find?
On most business websites we audit, the answer is chaos: five conflicting H1 headlines, a 90-character title tag that gets truncated on mobile screens, uncompressed 12-megabyte camera photos named 'IMG_4021.jpg' with zero alt tags, and lazy links that read 'click here' or 'learn more'.
Then the founder wonders why their organic traffic is stagnant.
This guide is the complete masterclass blueprint for engineering a single, perfect web page.
Whether you sell bespoke footwear on Shopify, publish editorial guides on WordPress, manage a portfolio on Webflow, or engineer custom storefronts in Next.js, this masterclass gives you the exact rules, formulas, and tools to compete for Page 1 and turn readers into paying customers—even if you have zero coding knowledge.
The Supermarket Shelf Illusion: Why Great Products Fail in Invisible Packaging
Imagine walking into a luxury grocery store looking for the finest organic olive oil.
Sitting on the middle shelf at eye level is a sleek bottle with an embossed golden label, a clear description of its cold-pressed Tuscan origin, and a visible price tag.
Next to it, pushed to the back corner on the floor, is an unmarked brown cardboard box with no label, no description, and no price.
The oil inside that cardboard box might be the greatest olive oil ever pressed in human history. But nobody will ever buy it. Shoppers will walk right past it, and the store clerk won't even know what is inside.
That is exactly what happens when you publish a great product or article without on-page SEO. On-page SEO is not tricking an algorithm with robotic keywords.
On-page SEO is designing the packaging, shelf placement, and spotlight so both human customers and Google's cataloging bots immediately understand what you sell, why it is superior, and why they should buy it right now.
The Title Tag Billboard: Why About 50–60 Characters Works
Think of your Title Tag as the giant billboard hanging above your physical retail storefront on Main Street.
It is the very first thing human shoppers see when they search Google, and it is one of the strongest clues Google has about what the page is about.
Google does not publish a character or pixel limit for titles. It shortens a title to fit the width of the screen, so the exact cut-off changes with the device and the letters you use.
That is why about 50–60 characters is a safe guide rather than a law. Put the search phrase first so it survives any cut, and expect Google to rewrite titles it finds vague, stuffed or inaccurate.
Below is an illustrative comparison of a keyword-stuffed snippet that gets cut off and a 59-character formula title:
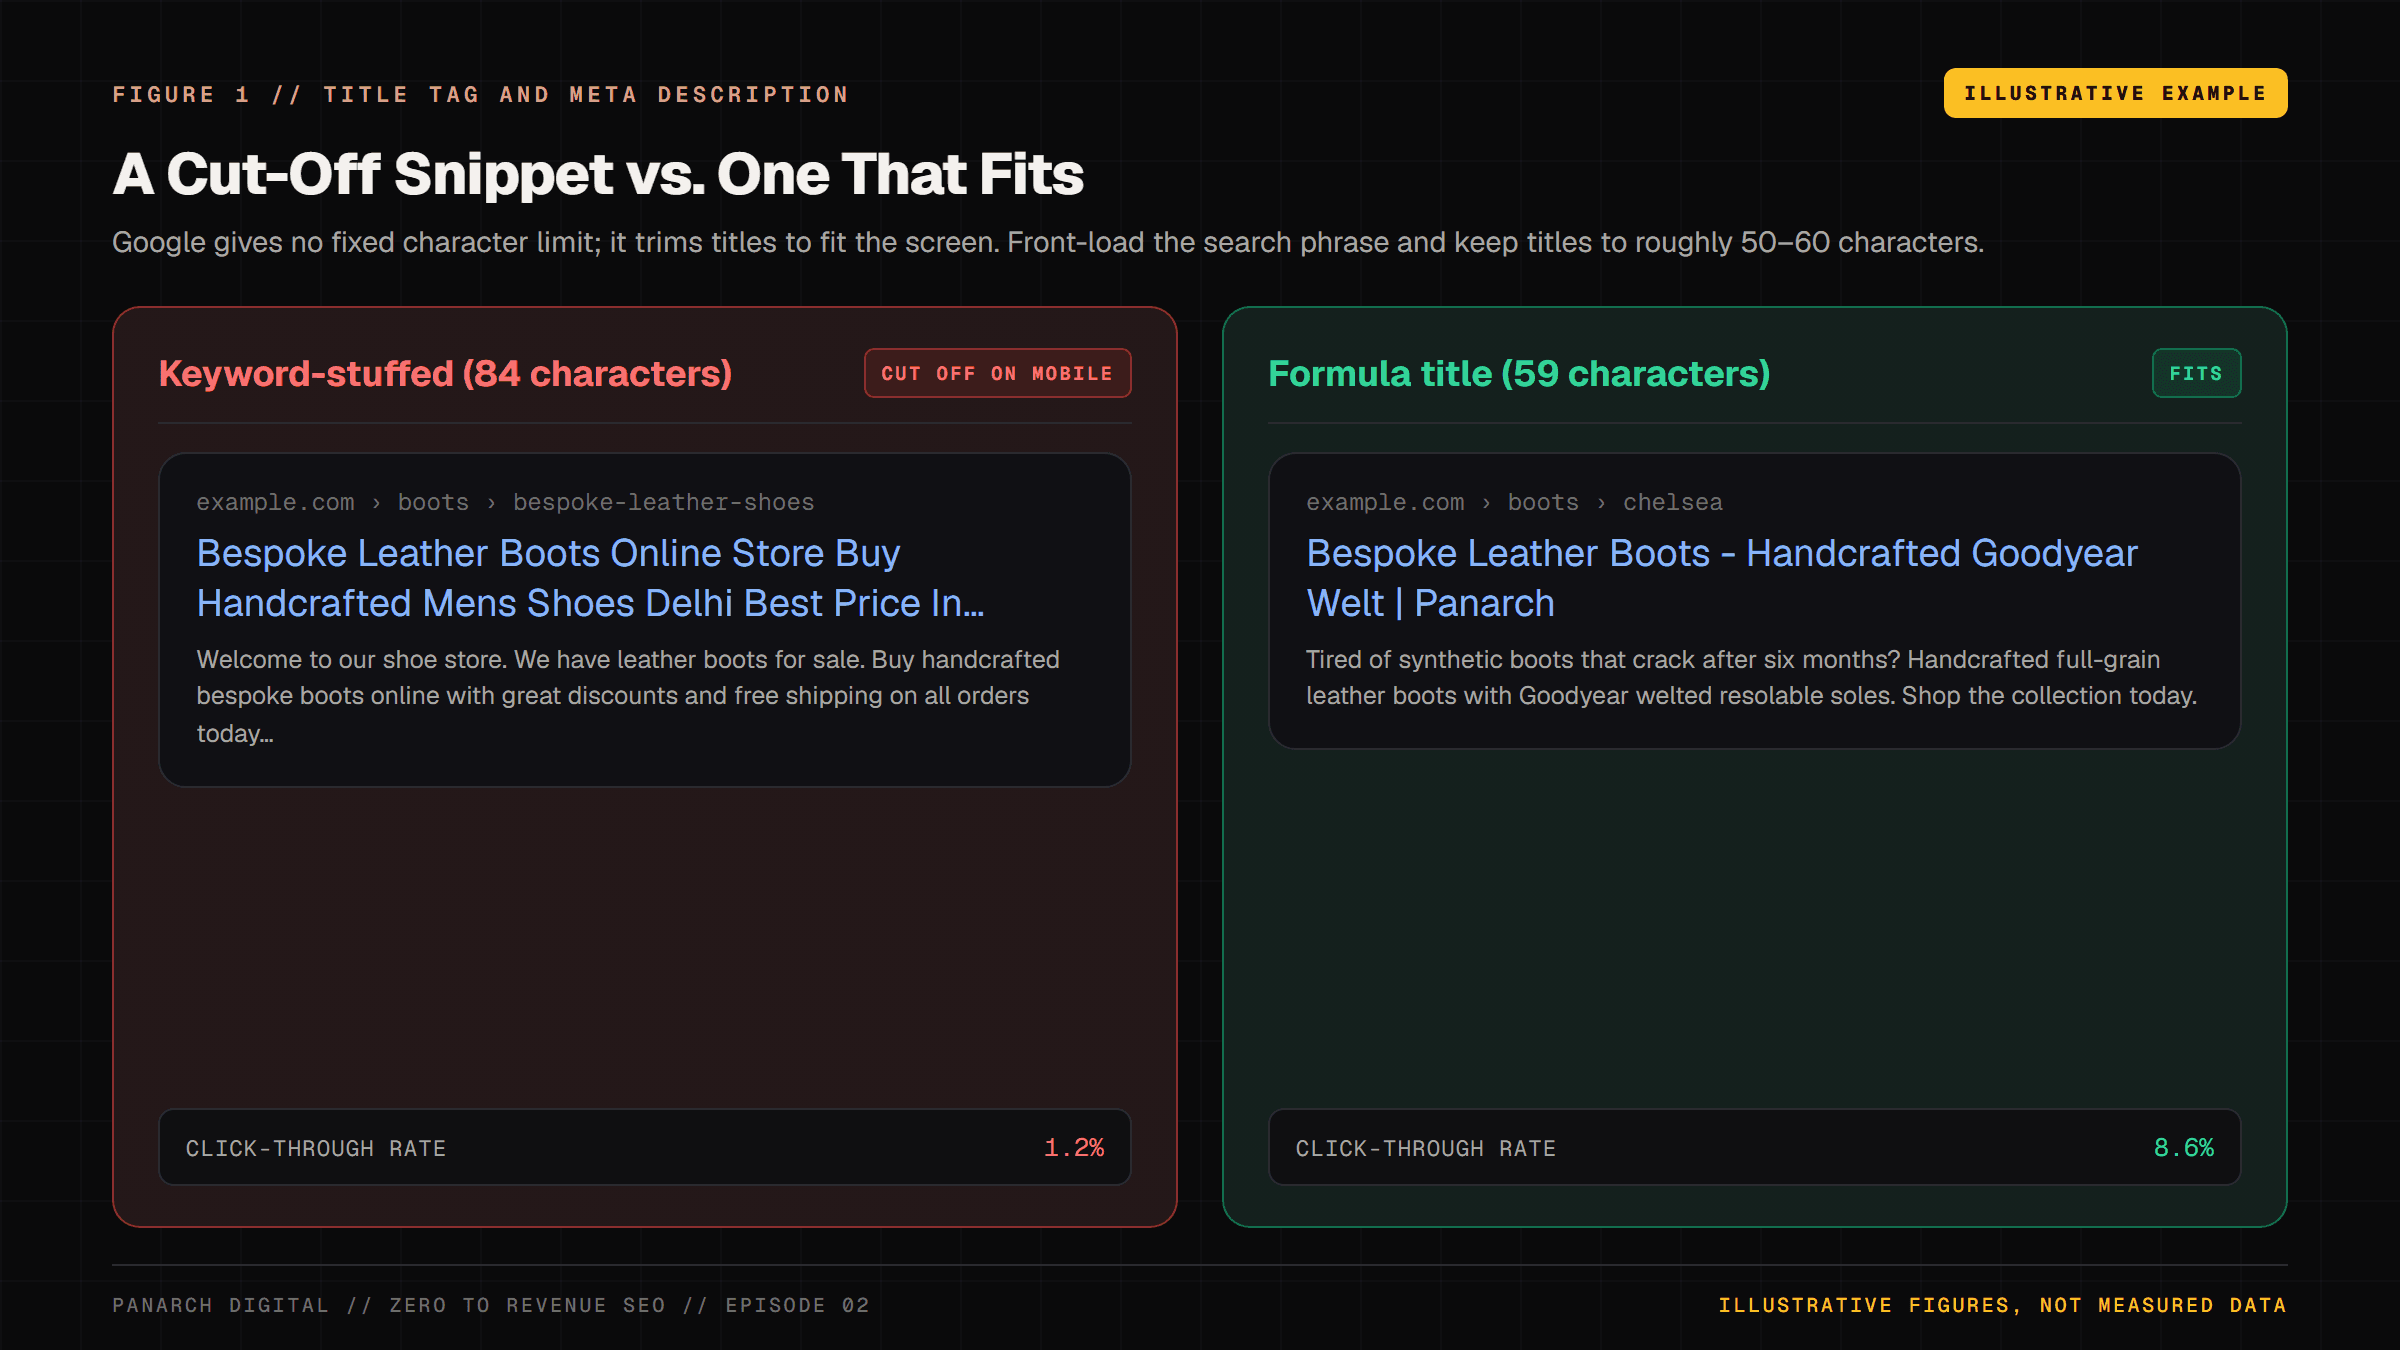
Letters are not all the same width: a capital 'W' is several times wider than a lowercase 'i'.
If your title is packed with wide characters and fluff words ('The Ultimate Complete Guide To Everything You Ever Wanted To Know About...'), Google chops off your headline with an ugly '...' right before your brand name appears.
To give your title the best chance of showing in full and earning the click (click-through rate, or CTR), use this 3-part formula:
- The Formula: [Primary Target Keyword] - [Concrete Outcome / Proof Hook] | [Brand Name]
- Example: 'Bespoke Leather Boots - Handcrafted Goodyear Welt | Panarch' (59 characters)
- Why It Converts: The primary keyword is placed at the absolute front where both human eyes and Google crawlers read first. The middle section provides immediate defensible proof ('Goodyear Welt'). The end anchors your brand authority.
The 155-Character Meta Description: The Two-Part Sales Pitch
If the Title Tag is your storefront billboard, your Meta Description is the sidewalk sandwich board standing outside your front door.
It does not directly influence your numerical ranking position in Google's algorithm, but it completely dictates your Click-Through Rate (CTR).
A brilliant meta description can turn a #3 ranking into more customer orders than a boring #1 ranking.
Never write vague marketing poetry like: 'We are passionate about redefining footwear experiences through innovative craftsmanship.' That tells the customer nothing. Instead, use our Two-Part Sales Pitch Formula:
- Part 1 (Acknowledge Pain Point & Present Solution): 'Tired of synthetic boots that crack in six months? Full-grain leather boots with resolable Goodyear welted soles.'
- Part 2 (Risk Reversal & Direct Call to Action): 'Free insured shipping in India. Shop today.'
- Length: 157 characters in total, so it usually shows in full. Google may still show a different passage from the page if it answers the search better, so make the opening of your page just as clear.
The Single H1 Rule & Heading Architecture: Organizing for Skim-Readers, Screen Readers & Google
Think of your web page as a daily morning newspaper. On the front page of a newspaper, there is exactly ONE giant headline (The H1).
Below that headline, the newspaper is divided into major sections (The H2s: National News, Business, Sports). Inside each section, individual stories have sub-headlines (The H3s).
Yet when we audit commercial websites, we routinely find four, six, or even ten different H1 tags on a single page! Why?
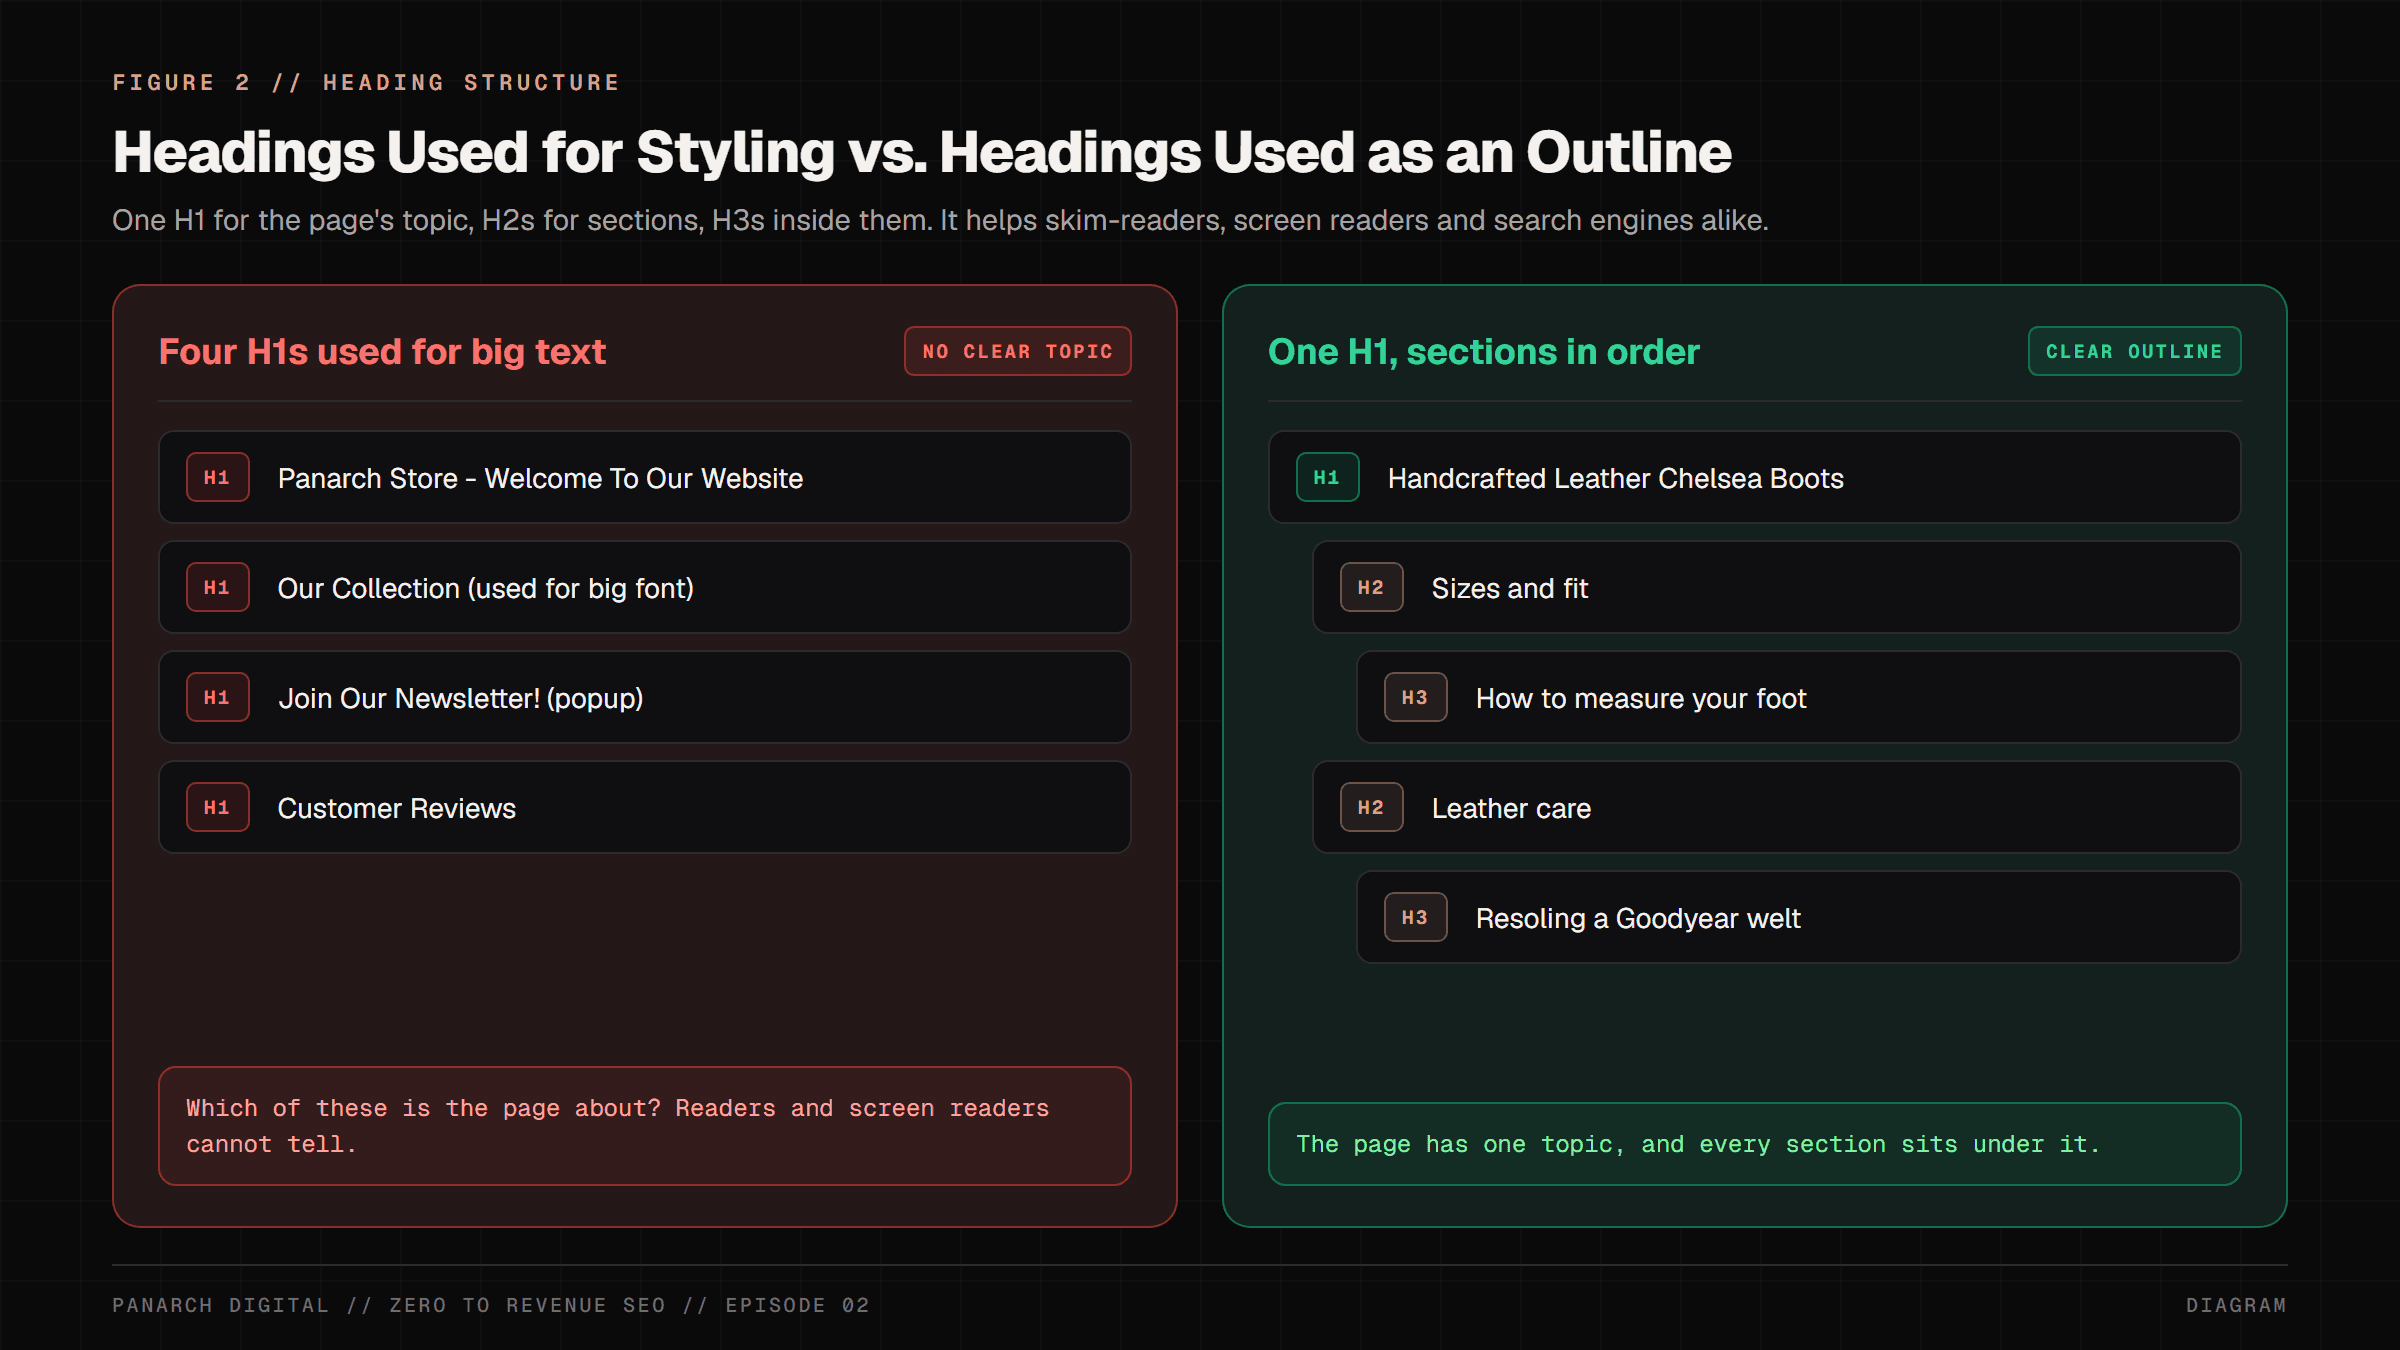
Because lazy web designers use H1 tags simply to make text look big on their screen, making logos, newsletter popups, and footer copyright notices into H1 tags. Readers, screen readers and Google all lose track of what the page is mainly about. Google says it can cope with several H1s, but it looks for one clear main title.
Below is the same boot product page outlined both ways:
Follow these three absolute structural rules:
- Rule 1: Exactly ONE H1 Tag Per Page. Your H1 must closely mirror your Title Tag, confirming to the visitor that they landed in the right place.
- Rule 2: Never Skip Heading Levels. Go from H1 to H2 to H3. Never jump from an H2 directly down to an H4. That confuses screen-reader users, who jump around a page by its headings.
- Rule 3: Never Use Heading Tags for Visual Styling. If you want a small testimonial or price card to have large bold text, use CSS font styling (or your visual editor's typography controls), never an H1 or H2 tag.
Image SEO in 2026: Google Lens, AVIF Compression & Descriptive Alt Tags
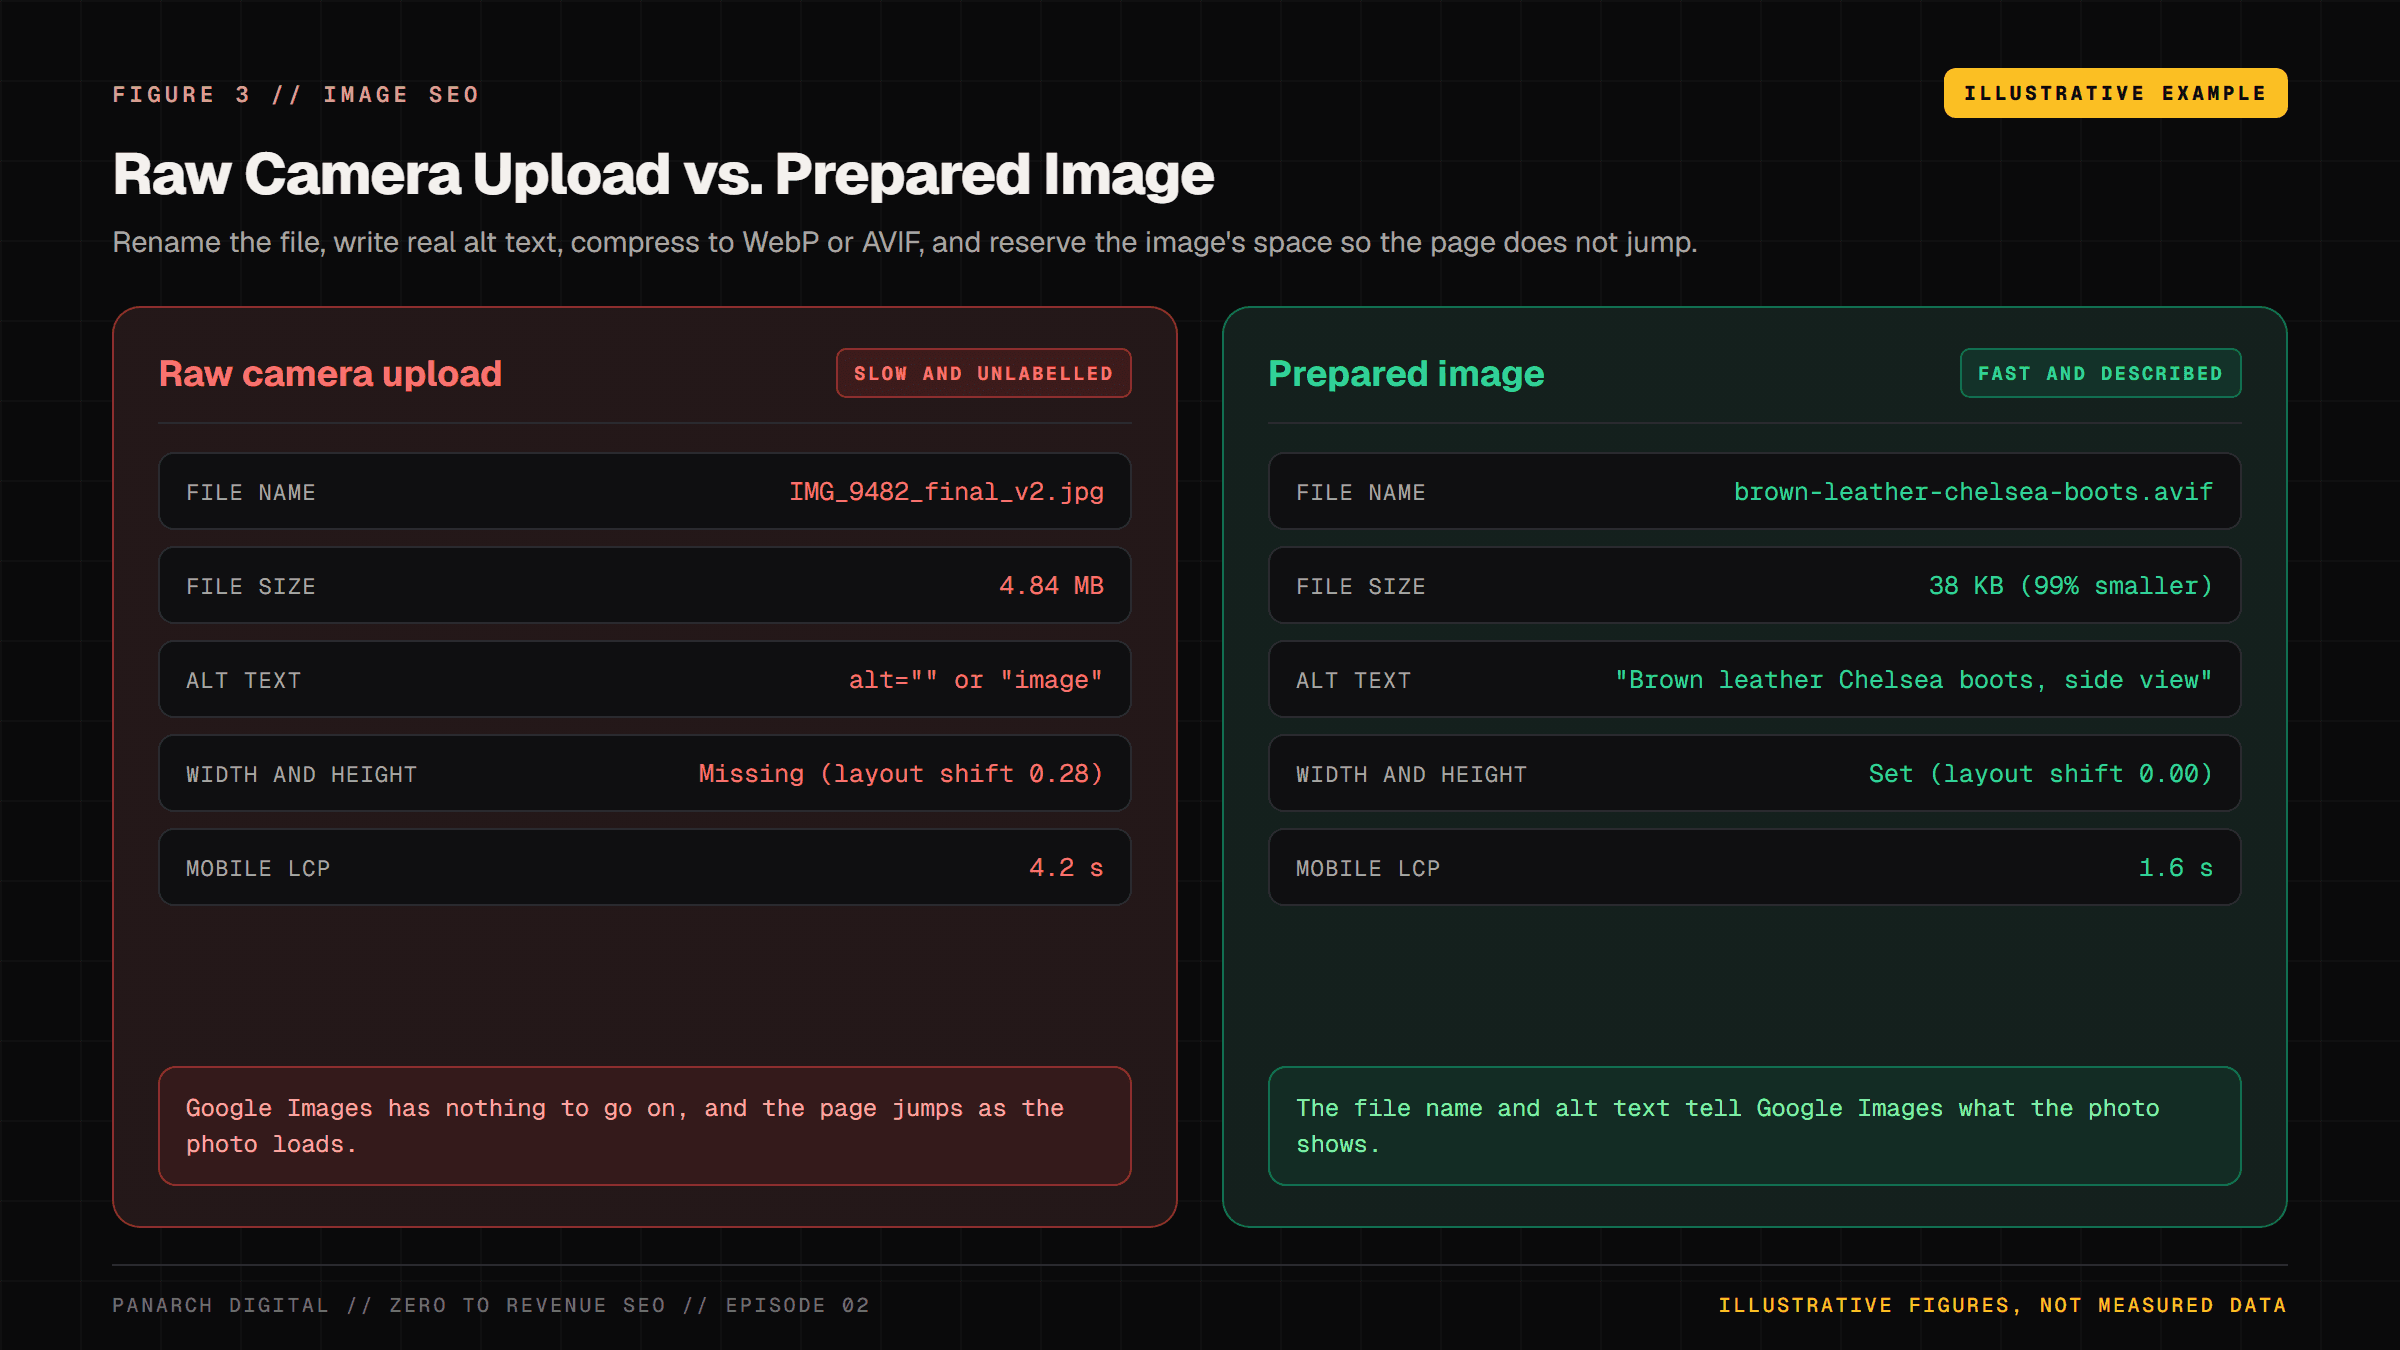
Shoppers increasingly search with pictures, through Google Images and Google Lens. Yet many stores upload uncompressed 10-megabyte camera photos named 'IMG_4901.JPG' with blank alt tags.
That slows your mobile pages and gives Google almost nothing to understand the photo by.
Below is an illustrative before-and-after for one product photo:
To dominate image search without writing complex code, execute this simple 3-part routine for every image you publish:
- Part 1: The Descriptive Filename Test: Never upload a photo named 'DSC_0023.jpg' or 'banner.png'. Rename the file before uploading to describe what is physically shown: 'mens-goodyear-welted-chelsea-boots-brown-leather.webp'. Use hyphens between words, never underscores.
- Part 2: The 'Telephone Description' Alt Text Test: How do you write the perfect alt tag? Close your eyes and imagine describing the product photo over a crackling telephone line to a friend who wants to order it. Bad Alt Tag: 'boots'. Keyword-Stuffed Spam: 'boots leather boots buy boots cheap boots india'. Perfect Semantic Alt Tag: 'Side view of men\'s brown handcrafted leather Chelsea boots with Goodyear welted rubber soles on white background.'
- Part 3: Compress to WebP or AVIF: Raw camera JPEGs and PNGs are far heavier than they need to be. Using free browser tools like Squoosh.app or TinyPNG, compress your photos into WebP or AVIF format. Aim for under 150KB for a full-width product photo, and much less for thumbnails.
The Wikipedia Highway: Internal Linking, PageRank Equity & Banning 'Click Here'
Why does Wikipedia rank on Page 1 for so many informational queries without spending a single dollar on advertising? Because Wikipedia operates the most disciplined internal linking highway system on the internet.
Every article contextually links to related topics using descriptive, keyword-rich anchor text.
Now examine typical e-commerce storefronts: New products and blog posts are published in complete isolation.
They are buried four clicks deep in paginated archives, and the only links pointing to them read: 'click here', 'read more', or 'view product'.
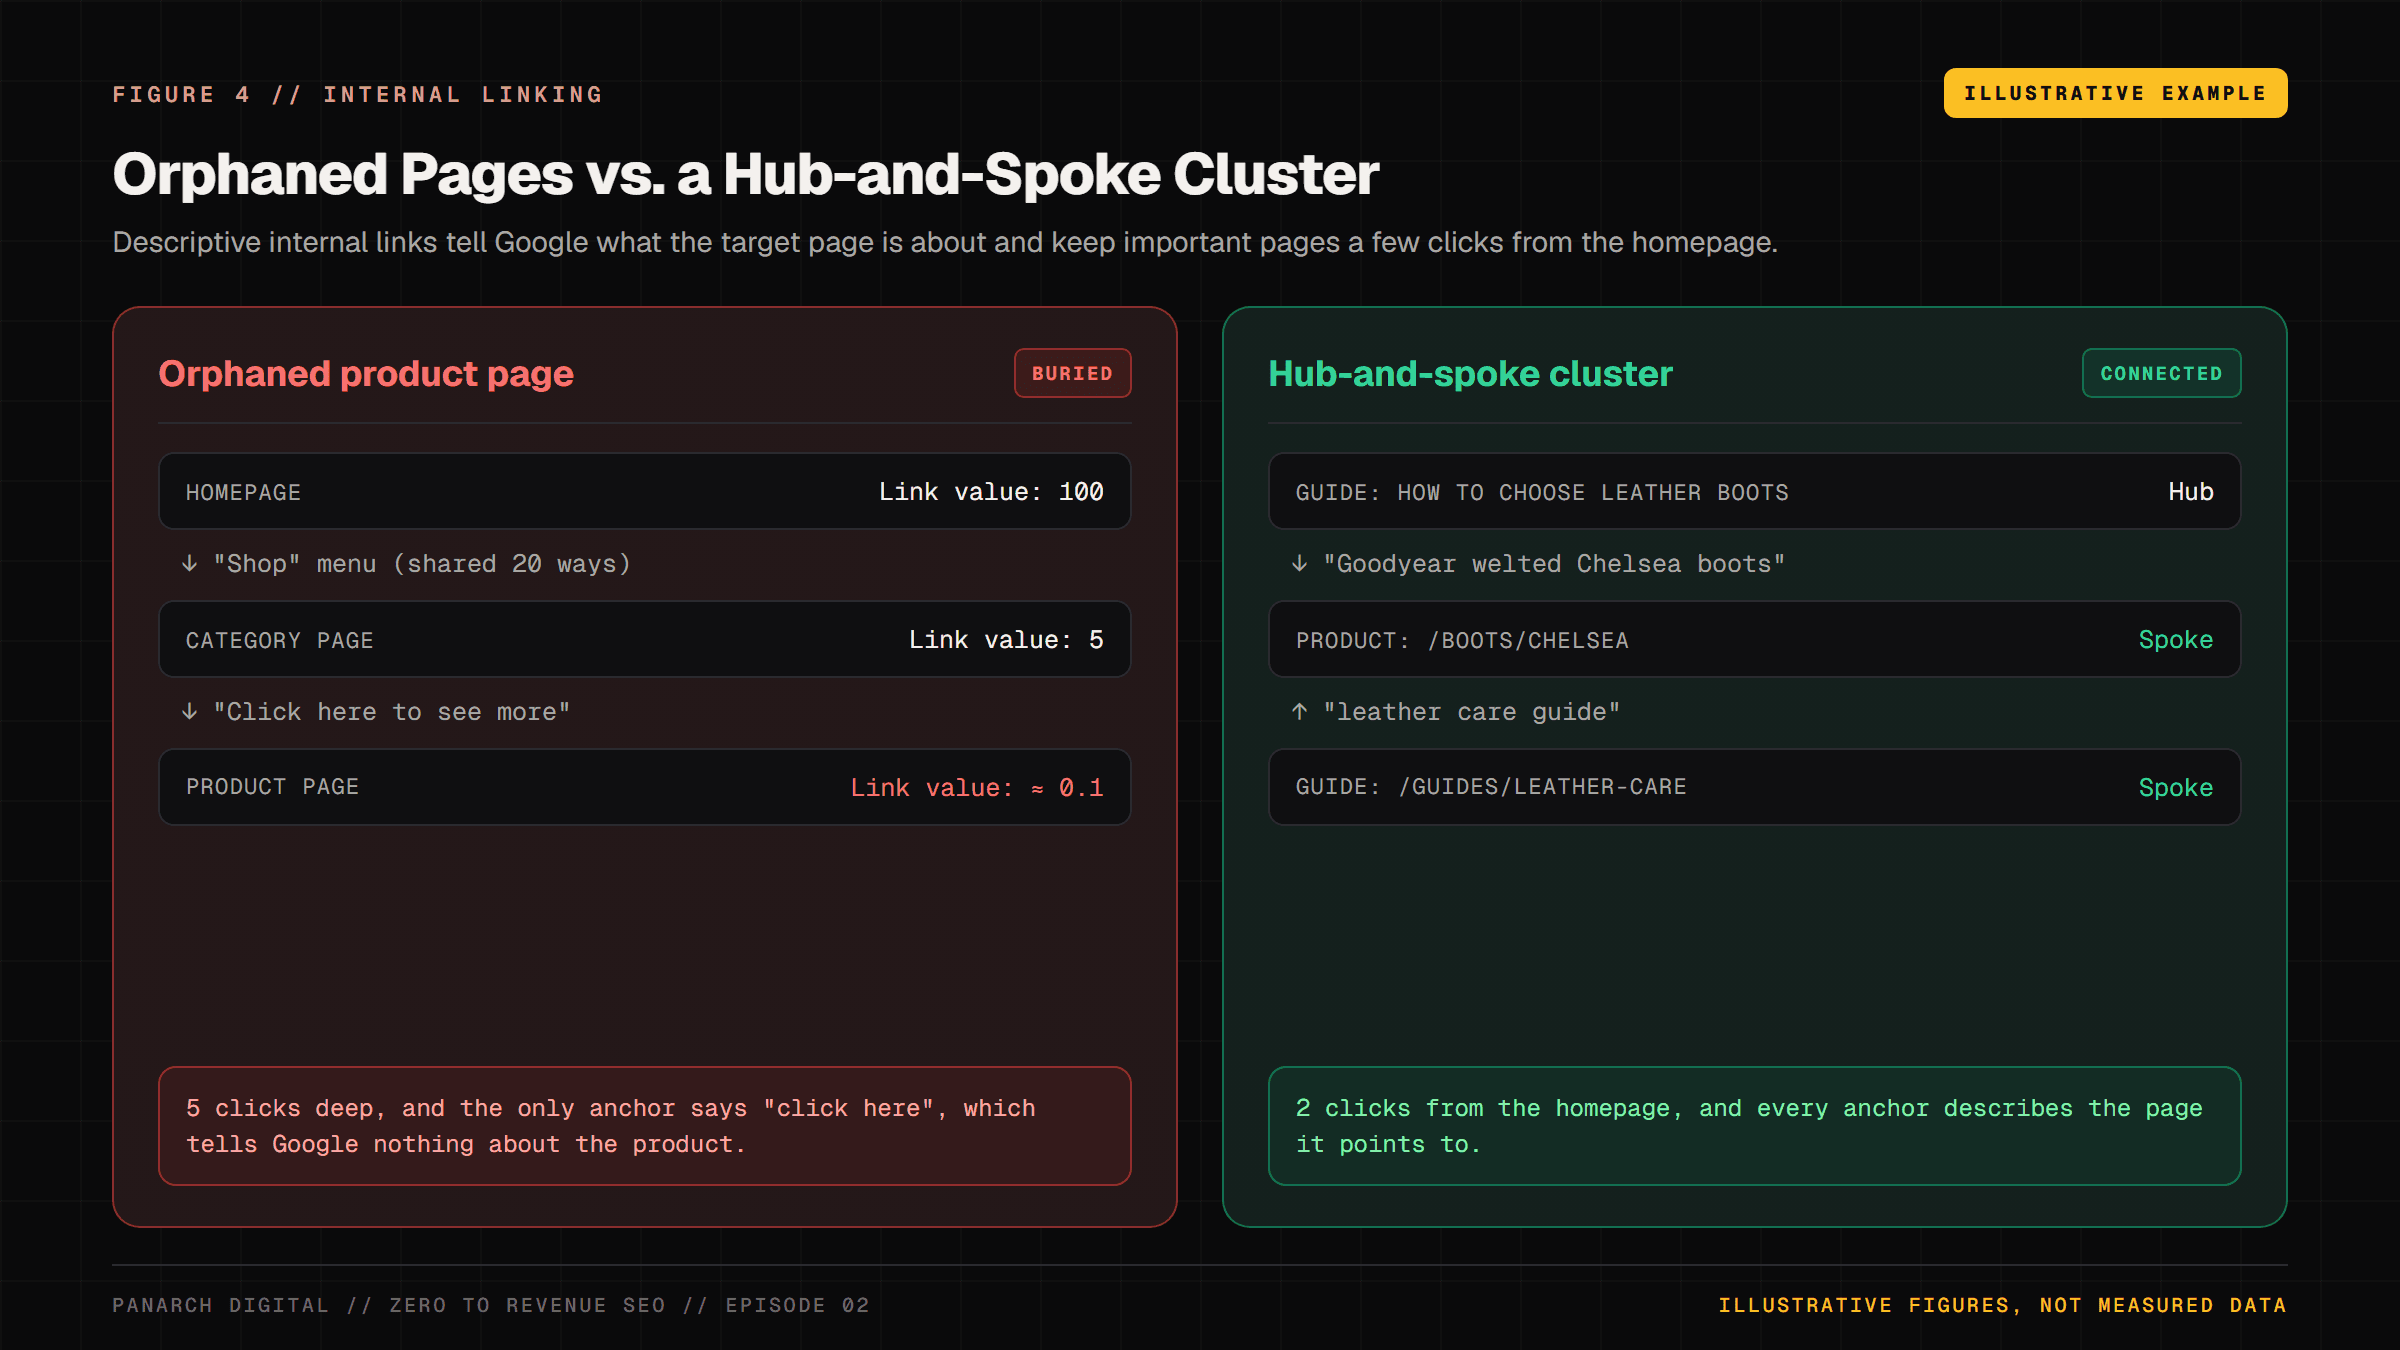
When you write a link with the anchor text 'click here', you are literally telling Googlebot: 'The destination webpage is an authority on the topic of clicking here.'
Because nobody searches Google for 'click here', you throw away the relevance signal the link could have carried.
Instead, construct Hub-and-Spoke Topic Clusters: Link from comprehensive guide articles directly to product and service checkout pages using descriptive phrases (e.g., 'explore our custom Next.js web development practice (/services/web-dev)' or 'see how we built a B2B wholesale ordering platform (/portfolio/mithila)').
Production Implementation: Zero-Code CMS vs. Custom Next.js 16
Whether you manage a no-code storefront or a custom engineering stack, here is how you implement these on-page rules in production right now:
The No-Code CMS Route (Shopify, WordPress, Webflow): On Shopify, open Shopify Admin -> Products -> Select your product -> Scroll down to 'Search engine listing' -> Click 'Edit' -> Paste your title (about 50–60 characters) and meta description (about 150–160) -> Click Save!
In the Media section, click on your uploaded image and fill in the 'Alt text' field with your descriptive phone test sentence.
On WordPress, install Yoast SEO or RankMath, open your post editor, scroll to the SEO box at the bottom, enter your Title and Description, and set your featured image alt text in the Media Library.
The Custom Engineering Route (Next.js 16 App Router): If you are building a custom React application, on-page SEO is engineered at compile time using dynamic metadata generators.
Below is the production TypeScript implementation of generateMetadata for product routes, building the title, description, canonical tag and OpenGraph social card from your product data:
import type { Metadata } from "next";
import { notFound } from "next/navigation";
import { getProductBySlug } from "@/lib/products";

interface Props {
  params: Promise<{ slug: string }>;
}

export async function generateMetadata({ params }: Props): Promise<Metadata> {
  const { slug } = await params;
  const product = await getProductBySlug(slug);
  if (!product) return {};

  const siteUrl = process.env.NEXT_PUBLIC_SITE_URL || "https://panarchdigital.com";
  // [Keyword] - [Proof] | [Brand]. Keep it short in the CMS; never slice it
  // here, or the title ends mid-word. Warn instead so an editor can fix it.
  const cleanTitle = `${product.name} - ${product.tagline} | Panarch Digital`;
  const cleanDesc = product.metaDescription;
  if (cleanTitle.length > 60) console.warn(`Long title: ${slug}`);

  return {
    title: cleanTitle,
    description: cleanDesc,
    alternates: {
      canonical: `${siteUrl}/products/${slug}`,
    },
    openGraph: {
      title: cleanTitle,
      description: cleanDesc,
      url: `${siteUrl}/products/${slug}`,
      siteName: "Panarch Digital",
      images: [
        {
          url: `${siteUrl}${product.coverImage}`,
          width: 1200,
          height: 630,
          alt: product.name,
        },
      ],
      type: "website",
    },
  };
}Automating Pre-Flight Audits with the Panarch On-Page CLI Wizard
To verify that your newly authored webpage adheres to every on-page SEO rule—including title and description length, single H1 hierarchy, alt tag coverage, and link anchor hygiene—Panarch Digital built a free terminal tool: The Panarch On-Page Wizard.
It runs the whole audit in one pass and is open source under the MIT licence at github.com/Arpan-Tyagi/panarch-seo-wizards. You only need Node.js 18.17 or newer. Prefer not to use a terminal? Check the same items with the Rich Results Test and the HeadingsMap extension below.
# Run it straight from GitHub (needs Node.js 18.17+):
npx --package=github:Arpan-Tyagi/panarch-seo-wizards \
onpage-wizard https://yourdomain.com/products/your-productThe wizard audits the HTML your server sends: measuring title and description length, counting H1 headlines and checking heading order, finding images without alt attributes, flagging generic 'click here' links, and confirming canonical, OpenGraph and JSON-LD tags.
It prints a checklist score out of 100 with a fix list. The score is the tool's own checklist, not a Google ranking signal.
The On-Page Master Tool Stack: Exactly What Tools to Use & How to Use Them Step-by-Step
Below is your complete, battle-tested On-Page Master Tool Stack.
For every tool, we provide the grounded concept, the free link, the 3-minute step-by-step SOP, where to edit and save (in Shopify, WordPress, Webflow, and custom code), and how to verify success versus failure:
- Tool 1: SERPsim Google Snippet Pixel Simulator [Cost: ₹0 / Free Web Tool]: Concept: The virtual billboard preview tool that calculates the exact physical pixel width of your Title and Description on Google's search result display. Step-by-Step SOP: (1) Go to serpsim.com in your web browser; (2) In the 'Title' field, type your proposed headline; (3) Watch the colored progress bar and keep it green (the pixel limit is SERPsim's estimate; Google publishes none, so aim for about 50–60 characters); (4) In the 'Description' field, type your two-sentence pitch (140–155 characters); (5) Check the live Google preview box to verify zero words are cut off with an ellipsis '...'. Where to Edit & Save: Shopify: Admin -> Products (or Pages) -> Scroll to bottom -> Search engine listing -> Click 'Edit' -> Paste Title and Description -> Click Save! WordPress: Scroll below your post editor to Yoast or RankMath -> Click 'Edit Snippet' -> Paste Title and Description -> Click Update! Webflow: Pages panel -> Click Gear icon -> SEO Settings -> Paste Title & Description -> Save and Publish! Next.js: Paste into your generateMetadata() function in src/app/[slug]/page.tsx. Where to Verify Success vs. Failure: Success: The SERPsim progress bar is green. View your live page, right-click, select 'View Page Source', and confirm the <title> tag matches your exact text without truncation. Failure: Red progress bar in SERPsim, and a preview that cuts off your title, for example: 'Bespoke Leather Boots - Handcrafted Goodyear Welt Made From The...', completely cutting off your brand name.
- Tool 2: Chrome HeadingsMap Extension [Cost: ₹0 / Free Chrome Extension]: Concept: The visual document scanner that instantly draws the architectural outline of your page to verify the Single H1 Rule. Step-by-Step SOP: (1) Install the free 'HeadingsMap' extension from the Chrome Web Store; (2) Open your live webpage and click the HeadingsMap icon in your browser toolbar; (3) Review the visual tree diagram. Where to Edit & Save: If you see multiple H1s or red warning badges: Shopify / WordPress / Webflow: Open your page editor. Highlight secondary text blocks (like logos, newsletter titles, or testimonial cards) that were accidentally styled as 'Heading 1' and change them to 'Heading 2', 'Heading 3', or standard Paragraph text. Click Save/Update! Next.js: Check your JSX component templates in src/components/ and ensure only the hero headline uses the <h1> tag. Where to Verify Success vs. Failure: Success: HeadingsMap displays a single root H1 headline with perfectly nested H2 chapters and zero red error badges. Failure: HeadingsMap shows several H1s or flags skipped levels (e.g. jumping from H2 directly to H4).
- Tool 3: Squoosh.app & TinyPNG Image Optimization [Cost: ₹0 / Free Web & CLI]: Concept: The image compression laboratory that shrinks multi-megabyte camera photos by 80–90% without sacrificing visual sharpness. Step-by-Step SOP: (1) In your browser, open squoosh.app or tinypng.com; (2) Drag and drop your product photo into the window; (3) Select format: WebP or AVIF; (4) Set quality slider to 75–80%; (5) Download the compressed file. Rename it using hyphens and descriptive keywords: 'brown-leather-goodyear-chelsea-boots.webp'. Where to Edit & Save: Shopify: Open Product Admin -> Media -> Upload the compressed image. Click on the image, find the 'Alt text' field, and enter your descriptive telephone test sentence -> Click Save! WordPress: Media Library -> Add New -> Upload image -> Fill out the 'Alternative Text' field -> Save! Next.js: Save into public/images/ and embed using the Next.js <Image src="..." alt="..." width={800} height={600} /> component. Where to Verify Success vs. Failure: Success: Image file size is under 150KB. Run Google PageSpeed Insights (pagespeed.web.dev): the image checks (in current versions, the 'Improve image delivery' insight) show little or no estimated savings. Failure: Uploading 12MB raw JPEGs. Mobile page load stalls for 5+ seconds, failing Core Web Vitals.
- Tool 4: Google Rich Results Test (JSON-LD Schema Verification) [Cost: ₹0 / Official Google]: Concept: Google's official testing suite that verifies whether your webpage contains structured data that enables rich snippets (product price, stock availability, breadcrumbs, and review stars from genuine customer reviews) directly in search results. Step-by-Step SOP: (1) Go to search.google.com/test/rich-results; (2) Paste your published webpage URL into the test box; (3) Click 'Test URL'; (4) Wait 30 seconds for Googlebot to analyze the structured data. Where to Edit & Save: Shopify: Modern Shopify themes (Dawn, Spotlight) automatically generate rich Product schema if you fill out your product details properly. Make sure Price, SKU, and Stock Status are filled out in Shopify Admin! WordPress: In RankMath or Yoast, navigate to the 'Schema' tab, select 'Product' or 'Article', fill out the fields, and click Update. Next.js: Inject a structured JSON-LD <script type="application/ld+json"> block into your server page template. Where to Verify Success vs. Failure: Success: Green shield with the text: 'Page is eligible for rich results'. Expanding the items shows 'Product snippets' and 'Merchant listings' with zero errors. Failure: A red error such as a missing 'priceCurrency', which makes the item ineligible. Fix it by filling in the product details in your store admin. A yellow warning for a missing 'aggregateRating' is optional: only add ratings that come from real customer reviews, never invented ones. FAQ rich results now appear only for well-known government and health sites, so do not expect FAQ dropdowns.
- Tool 5: The Panarch On-Page SEO Wizard [Cost: ₹0 / Open source, MIT]: Concept: A command-line scanner that checks title and description length, the Single H1 Rule, heading order, image alt coverage, generic 'click here' links, canonical, OpenGraph and JSON-LD in one pass. Step-by-Step SOP: (1) Install Node.js 18.17 or newer from nodejs.org; (2) Open a terminal; (3) Run: 'npx --package=github:Arpan-Tyagi/panarch-seo-wizards onpage-wizard https://yourdomain.com/products/your-product'; (4) Read the fix list. Where to Edit & Save: The code is on GitHub (github.com/Arpan-Tyagi/panarch-seo-wizards); fork it to change the rules, or add --fail-under 80 to run it before each deploy. Where to Verify Success vs. Failure: Success: Green PASS lines for the title, the single H1, image alt text and link anchors. Failure: A red FAIL line naming the problem, for example images with no alt attribute, followed by the exact fix.
The Panarch Digital On-Page Perfect Page Checklist (Notion Template)
To help engineering and content teams execute on-page optimization flawlessly across every newly published route, Panarch Digital is turning this pre-publish workflow into a free Notion checklist. It is being published now; until it is live, the four phases below are the checklist.
The checklist is divided into four chronological phases:
- Phase 1: SERP Billboard Verification (Writing titles of about 50–60 characters with the search phrase first, and descriptions of about 150–160 characters).
- Phase 2: Semantic Document Architecture (Validating exactly one <h1> per route, logical <h2> chapter breakdown, and clean hyphenated URL paths).
- Phase 3: Media & Visual Search Optimization (Converting camera files to AVIF/WebP files under 150KB, writing descriptive alt text, and enforcing explicit aspect ratios).
- Phase 4: Topic Cluster & Internal Link Topology (Connecting the page to parent pillar guides via contextual anchors and verifying self-referencing canonical tags).
When the Notion template is live, the link will appear on the course resources hub at panarchdigital.com/resources.
Sovereign Engineering: How Panarch Digital Solves Organic Growth
Panarch Digital does not sell monthly PDF reports or cosmetic meta-tag retainers.
We partner with ambitious D2C brands, B2B enterprises, and high-growth founders to replace fragile third-party dependencies with custom, sovereign web infrastructure.
We engineer ultra-fast Next.js storefronts, automated programmatic SEO engines, and verifiable Core Web Vitals performance that turns organic search into your most profitable revenue channel.
If you are ready to stop renting your customers and start owning compounding digital equity, review our technical practices or schedule an engineering architecture audit with our team:
- Explore our Technical SEO & Core Web Vitals Practice (/services/seo)
- Inspect our High-Performance Headless Web Development Services (/services/web-dev)
- Benchmark your storefront against our real-time performance baseline (/performance-baseline)
Frequently asked
What is the difference between on-page SEO and technical SEO?
On-page SEO focuses on the content, semantic structure, and media elements of individual web pages—such as title tags, heading hierarchies, meta descriptions, image alt tags, and internal link anchors. Technical SEO focuses on the underlying infrastructure governing crawlability and indexation—such as robots.txt rules, dynamic XML sitemaps, server response times (TTFB), client-side hydration bottlenecks, and Core Web Vitals performance.
Why does Google rewrite my Title tag in search results?
Google lists seven common reasons: the title is half-empty, out of date, inaccurate for the page, the same boilerplate repeated across many pages, missing a clear main title, in a different language or script from the page, or repeating the site name. Write a unique, accurate title for every page that matches its main heading. Length is not on that list, but long titles are cut to fit the screen.
Does having multiple H1 tags on a page hurt SEO?
Not directly: Google says it can handle pages with more than one H1, so it is not a penalty. But Google looks for one clear main title, and a single H1 with H2 sections and H3 subsections is clearer for readers and screen readers. Treat one H1 per page as a clarity rule, not a ranking trick.
How do image alt tags help organic search rankings?
Image alt tags serve a dual purpose: they provide accessibility descriptions for screen readers used by visually impaired users, and they provide search engines with context regarding the subject matter of the image. Descriptive alt text helps your images appear in Google Images, which can bring shoppers who are already looking at the product.
Sources
- Google Search Central: Controlling Your Title Links in Search Results
- W3C WAI: Headings (Page Structure Tutorial)
- Google Search Central: Image SEO best practices
- Google Search Central: Control your snippets in search results
- Google Search Central: Link best practices for Google
- Google Search Central Blog: Changes to HowTo and FAQ rich results (2023)
- Google Search Central: Review snippet structured data
- Google Search Central: Understand How Structured Data Works
Related