
Course episodes / unit 01
Summary
Google evaluates websites through a three-stage pipeline: crawling web documents via hyperlinks, indexing parsed data into a searchable database, and ranking the indexed pages by relevance and quality for each search. Paid ads are rented reach that stops when the spend stops; organic SEO builds owned digital equity that keeps bringing buyers after the work is done.

Unit 01 // Workstation
Let Google in, then ask it to crawl
- 02 Tool
- Google Search Console (free)
- 04 Where to edit
- Online Store → Preferences → Password protection. Untick “Restrict access to visitors with password” when you launch.
- 04 Where to save
- Save.
- 05 Verify
- Search Console → URL Inspection → paste the URL → Test Live URL → Request Indexing.
- Pass
- URL Inspection shows “URL is on Google”.
- Fail
- “Discovered - currently not indexed” or “Crawled - currently not indexed”, or a noindex tag in the page source.
Episode 1 of the free Zero to Revenue SEO course. Next: Episode 2, The Anatomy of a Perfect Web Page (/blog/zero-to-revenue-seo-on-page-perfect-page).
Every founder, marketing director, and e-commerce operator has endured the same monthly ritual: An invoice arrives from an agency charging ₹50,000, ₹1,00,000, or $3,000 a month for 'search engine optimization'.
Attached to that invoice is a 40-page auto-generated PDF report bursting with multi-colored graphs, vanity metrics, and esoteric jargon about 'algorithmic headwinds', 'keyword velocity', and 'toxic link profiles'.
Yet when you open your bank account or Shopify dashboard, the brutal truth stares right back at you: Organic revenue hasn't budged.
Customer acquisition costs are rising, your blended margins are bleeding, and the moment you reduce your Meta or Google Ads budget, your sales collapse to zero.
This guide is the definitive antidote to agency fiction. We are stripping away the pseudo-science and treating search engine optimization for what it actually is: a deterministic engineering discipline and digital real estate architecture.
You will learn exactly how Googlebot operates, why paid advertising is an addictive hamster wheel, how to build compounding digital equity, and how anyone—even with zero coding knowledge—can run the exact free tool workflows that give your pages a fair shot at Page 1.
The ₹50,000/Month Agency Illusion: Demystifying the Occult Science of SEO
The traditional search marketing industry survives by convincing non-technical founders that Google's algorithm is an inscrutable deity that must be appeased with monthly financial offerings.
They invent mystical terminology to hide a simple fact: they are charging you thousands of dollars to change three meta descriptions and buy spam links on low-grade blog networks.
Below is our illustrative autopsy of what a typical monthly agency retainer buys versus what an engineering-led search architecture actually requires. It is a sketch of the pattern, not a survey of real invoices:
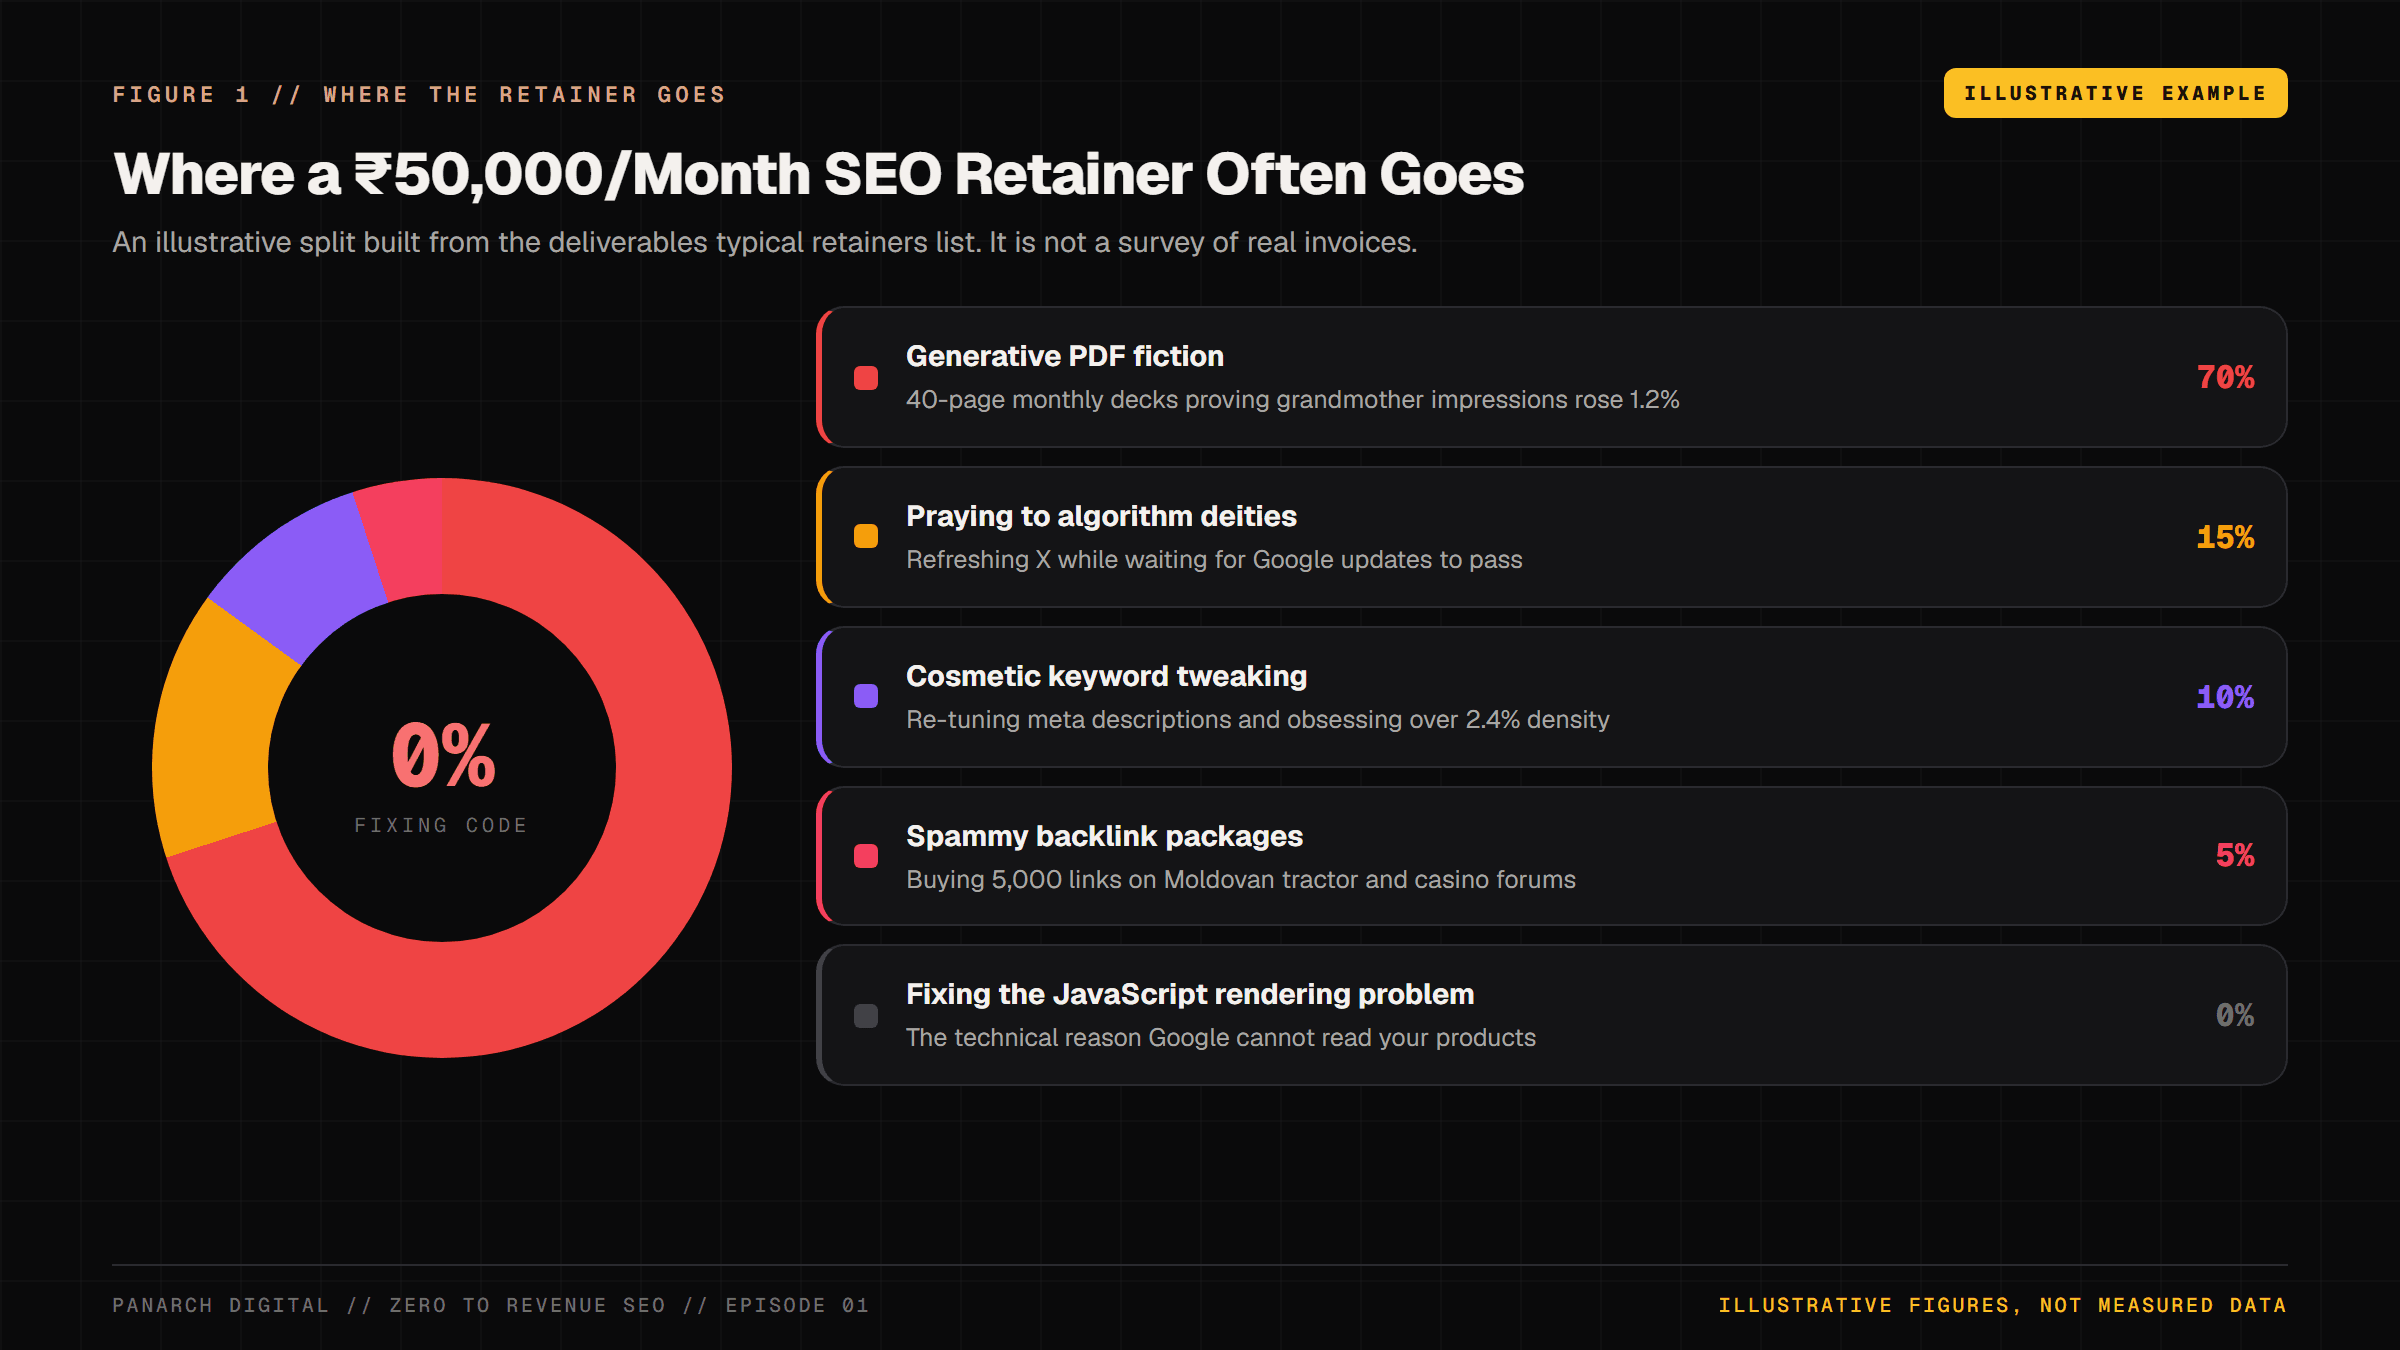
When you examine an agency retainer through an engineering lens, the scam becomes painfully obvious.
Founders are paying agency account managers to tweak cosmetic text on the frontend while the underlying website is completely invisible to search engines due to broken crawl pathways and client-side JavaScript rendering bottlenecks.
The Hall of Shame: 5 Absurd SEO Scams Still Sold to Founders in 2026
Before you spend another rupee or dollar on search marketing, familiarize yourself with the five most common scams still being sold to unsuspecting businesses:
- The 'Guaranteed #1 Ranking on Google' Trap: Google's own guidance says it plainly: no one can guarantee a #1 ranking on Google. Agencies selling this trick deliver rankings for fabricated vanity phrases with zero search volume (e.g., 'artisan purple organic leather boots in South Delhi pin code 110017') that generate zero commercial revenue.
- The ₹5,000 Fiverr / PBN Backlink Package: Purchasing 500 links from private blog networks (PBNs) hosted on expired Russian, Moldovan, or Indonesian domains. Google's SpamBrain system is built to catch link spam. At best the bought links are ignored and you paid for nothing; at worst a link scheme earns a manual action from Google's reviewers that drops pages from the results.
- The 40-Page Automated PDF Report: Delivering automated printouts from enterprise suites (Semrush, Ahrefs, Moz) decorated with agency logos. You are paying ₹50,000 for an employee to press 'Export to PDF' once every thirty days.
- The Green Plugin Dopamine Trap: Believing that getting a green light on a WordPress plugin (Yoast or RankMath) means your page will rank. These plugins check on-page text rules. They have no idea whether Googlebot can render your JavaScript or whether your server takes 4,000 milliseconds to respond.
- The 'Toxic Backlink Disavow' Retainer: Charging monthly fees to audit and submit Google Disavow files. Google says it ignores most spammy links automatically, and its own disavow documentation says most sites will never need the tool.
Equity vs. Rent: Why Paid Ads Keep You on a Hamster Wheel While SEO Builds a Fortress
To build a sustainable commercial business, you must understand the balance sheet distinction between Rented Reach and Owned Digital Equity:
Paid advertising (Meta Ads, Google Performance Max, TikTok Ads) is Rented Reach. You are paying a landlord (Mark Zuckerberg or Sundar Pichai) a daily toll for temporary eyeballs.
The moment you pause your ad spend, your traffic drops to exactly zero. You build zero residual equity, and your customer acquisition costs (CAC) scale linearly or exponentially as auction competition increases.
Organic Search Engine Optimization is Owned Digital Equity. When you engineer high-performance web architecture, publish authoritative transactional content, and earn high-affinity entity trust, you own a compounding financial fortress.
An article or category page ranking in the top three positions for high-intent commercial keywords delivers qualified, ready-to-buy customers every hour of every day—at zero incremental advertising expense.
The Grand World Library: The Three Jobs of Google (Crawl, Index, Rank)
To dominate Google without paying an agency, you do not need a computer science degree. You only need to understand the simple physical analogy of the Grand World Library.
Think of Google as a giant global library containing billions of books. To make your website visible and profitable, Google must successfully complete three distinct jobs:
- Job 1: Crawling (The Postal Delivery Truck): Google operates an automated fleet of computer programs called 'Googlebot' (web crawlers). Think of Googlebot as a postal delivery truck driving down every digital street in the world. It discovers web pages by following hyperlinks from one page to another. If your website has no links pointing to it, or if you accidentally put a 'No Entry' sign on your door, Googlebot's truck drives right past you.
- Job 2: Indexing (The Library Catalog Shelf): Once Googlebot fetches your web page, it reads the content, unpacks the words, images, and structure, and files it away into Google's colossal search database (the Index). If your page is empty, a copy of another page, or written in code the librarian cannot read, Google leaves it off the shelf or files it under the other copy.
- Job 3: Ranking (The Master Librarian's Recommendation): When a customer walks into the library and types a question into the search bar, Google's ranking systems sort the matching pages in a fraction of a second. The librarian picks the most relevant, helpful and trustworthy pages for Page 1. Speed counts as part of page experience, but it is one signal among many, not the main one.
The Ingestion Chasm: Why Bloated JavaScript Storefronts Get Thrown in the Trash
Here is the dirty secret most digital marketing agencies never check: Google does NOT read modern web pages the same way a human does.
When a human opens a website, their high-powered MacBook or iPhone downloads megabytes of JavaScript and executes it smoothly.
But Googlebot crawls billions of pages, and running heavy JavaScript for every one of them is expensive, so Google does it as a separate step.
Google first crawls the raw HTML, then puts the page in a queue for its Web Rendering Service (WRS), which runs the JavaScript like a browser would. If your content only appears after that JavaScript runs, you fall into what we call the Ingestion Chasm:
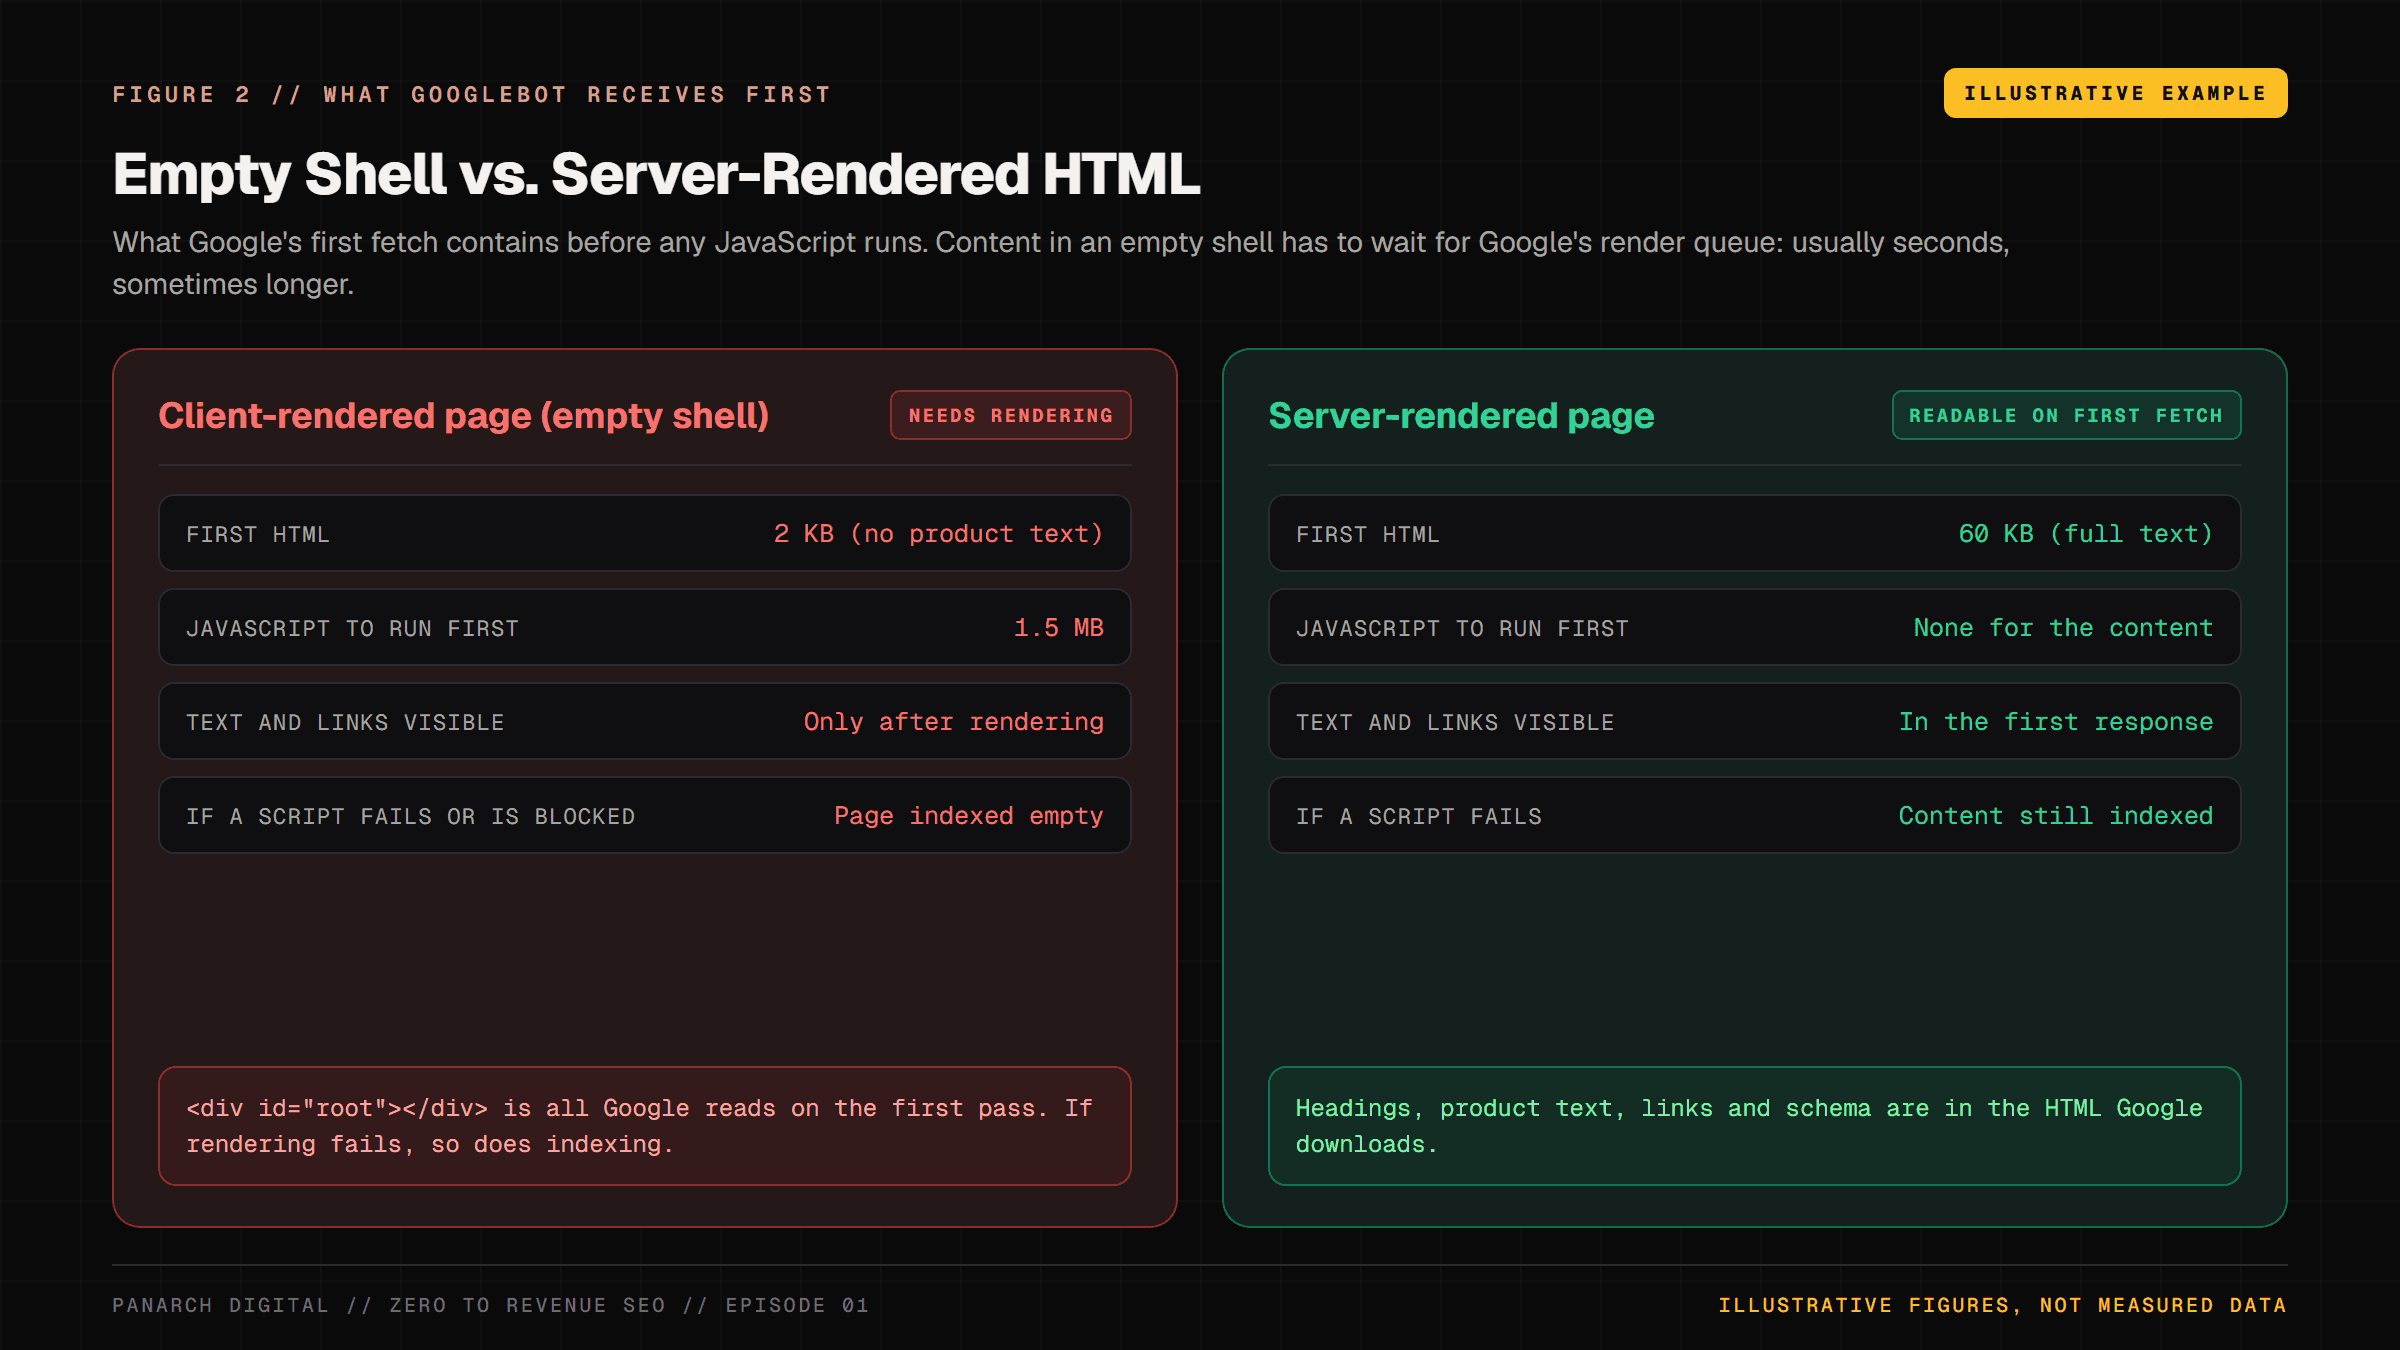
When Googlebot finds an empty shell, the page waits in the render queue. Google says that wait is usually a few seconds but can be longer, and if a script fails or is blocked in robots.txt, Google never sees the content at all.
If your server is slow or keeps returning errors, Googlebot crawls your site less, and a page it cannot fetch cannot be indexed.
You could have the greatest product in the world, but if Googlebot cannot read your page, it cannot rank it. Put your important text and links in the HTML the server sends.
The Step-by-Step Execution Course: How Anyone Can Do It Correctly From Scratch
Now that you understand the physical reality of search, let us walk through the exact, step-by-step process to take any website from invisible to a site Google can find, read and rank.
Whether you manage a Shopify store, a WordPress blog, a Webflow portfolio, or a custom Next.js application, follow this exact procedural roadmap:
Stage 1: Pre-Flight Triage & Codebase Hygiene
Before you write a single word of content or spend time researching keywords, you must audit whether your domain is physically open for business. Follow this simple 3-step triage:
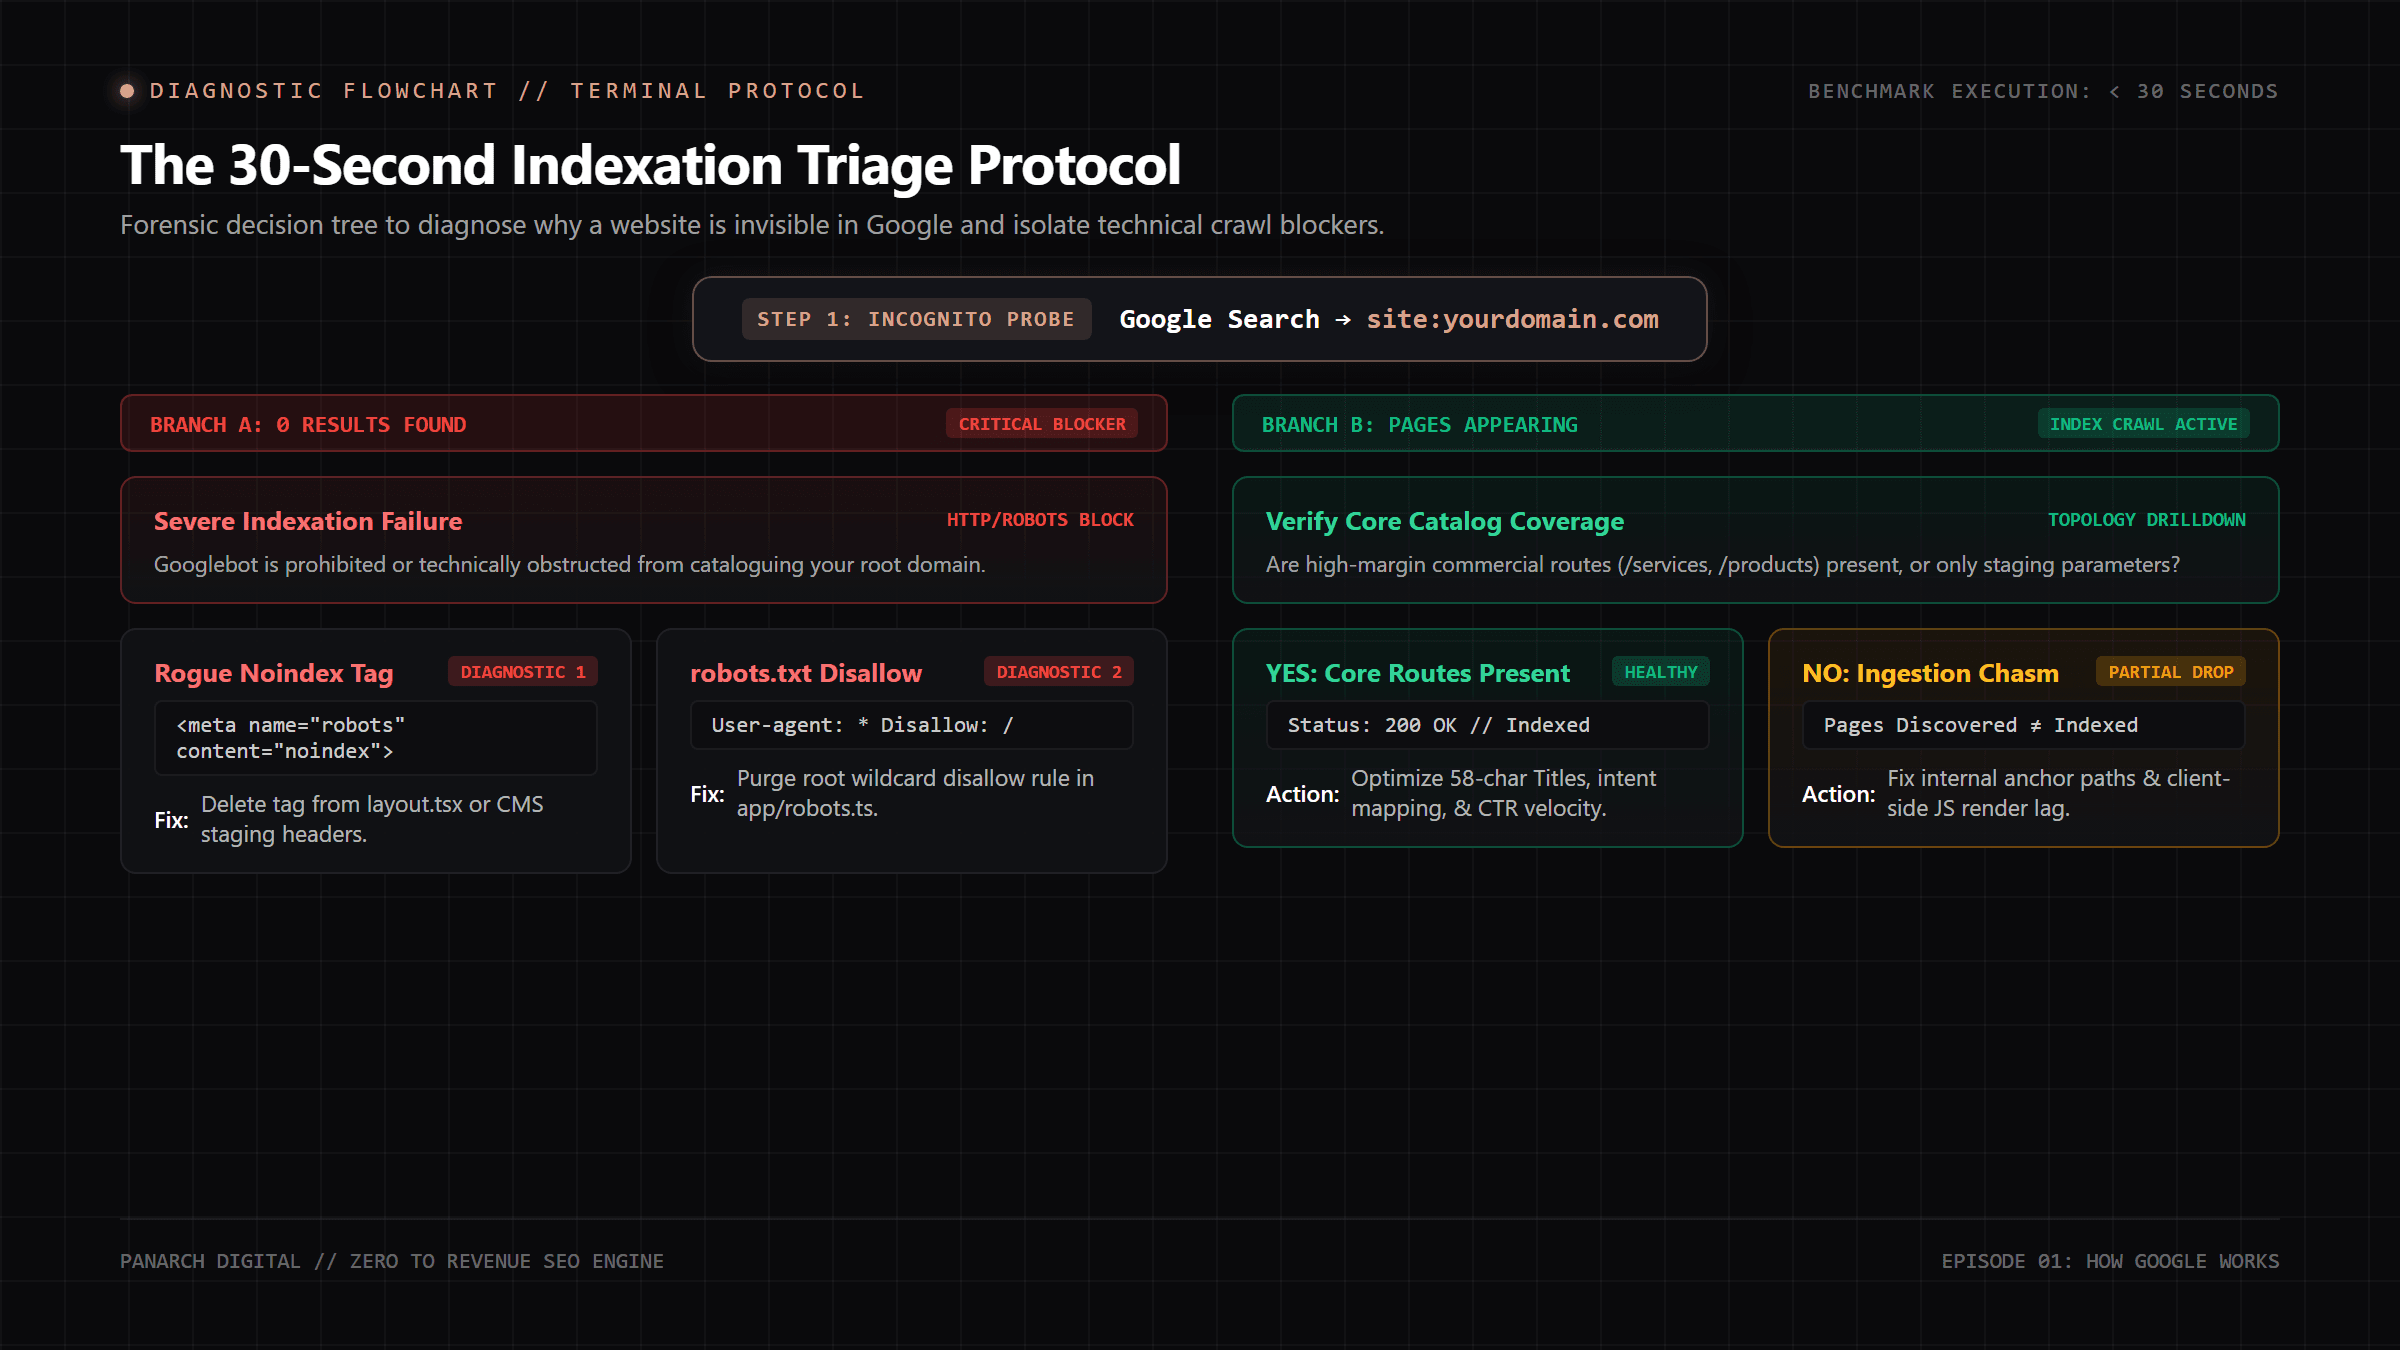
- Step 1.1: Run the Incognito 'site:' Query: Open your web browser in an incognito or private window (Ctrl+Shift+N or Cmd+Shift+N). Go to Google and type: site:yourdomain.com (replace with your real domain name, with no spaces). If Google returns '0 results found', your website has a critical technical block that makes it completely invisible. If results appear, verify that your real product and service pages show up, rather than internal search queries or password-protected staging pages.
- Step 1.2: Check for Accidental 'noindex' or Password Blocks: If you are on Shopify: Open Shopify Admin -> Online Store -> Preferences. Scroll down to 'Password protection'. If 'Restrict access to visitors with password' is checked, your store is completely blocked from Google! Uncheck it when you launch. If you are on WordPress: Go to Settings -> Reading. Look for 'Search engine visibility'. If the box 'Discourage search engines from indexing this site' is checked, uncheck it immediately and click Save Changes! If you are on Next.js: Check src/app/layout.tsx and make sure your metadata specifies 'robots: { index: true, follow: true }'.
- Step 1.3: Verify Single Canonical Domain Security: Open your browser and type your domain four different ways: (1) http://yourdomain.com, (2) http://www.yourdomain.com, (3) https://yourdomain.com, and (4) https://www.yourdomain.com. All four versions must automatically redirect to your single, preferred HTTPS address. If all four load separately, Google sees four copies of your store. It is not a penalty, but Google has to guess which copy to show, and your links get split between them.
Stage 2: Official Google Search Console Setup (The Free Direct Hotline to Google)
Google Search Console (GSC) is the single most important tool in all of SEO. It is 100% free, created by Google, and serves as your website's private, verified communication hotline with Google's indexing team.
Here is how to set it up in under 5 minutes without writing any code:
- Step 2.1: Open Google Search Console: Go to search.google.com/search-console and log in with your primary Google account. Click the top-left property dropdown and select 'Add Property'.
- Step 2.2: Choose Your Verification Method: Method A (Shopify): Use Method C (DNS) below; it is the no-code route. Shopify has no Search Console box in Preferences. If you must use the 'URL prefix' HTML tag instead, first open Online Store -> Themes, click the three dots next to your live theme and choose 'Duplicate' (your backup). Then choose 'Edit code' on the live theme, open layout/theme.liquid, paste the tag on its own line just below <head>, click Save, return to GSC and click 'Verify'. Method B (No-Code WordPress): In GSC, copy the HTML tag. Open WordPress Admin -> Yoast SEO -> Settings -> Site connections (or Rank Math -> General Settings -> Webmaster Tools), paste it into the Google verification box, and click Save. Method C (Domain DNS - Recommended for all platforms): Select the left-side 'Domain' card in GSC. Enter your bare domain (e.g. 'panarchdigital.com'). Copy the TXT verification string. Open your domain provider (GoDaddy, Namecheap, Cloudflare), go to DNS Management, click 'Add Record', choose Type: TXT, Name: '@', paste the code into Value, and click Save. Return to GSC and click 'Verify'.
- Step 2.3: Submit Your XML Sitemap: Once verified, click 'Sitemaps' in the left menu. In the 'Add a new sitemap' field, type 'sitemap.xml' and click Submit. Within a few days the status should read 'Success'. That means Google could read the sitemap, not that every page is indexed; the Pages report shows which pages are.
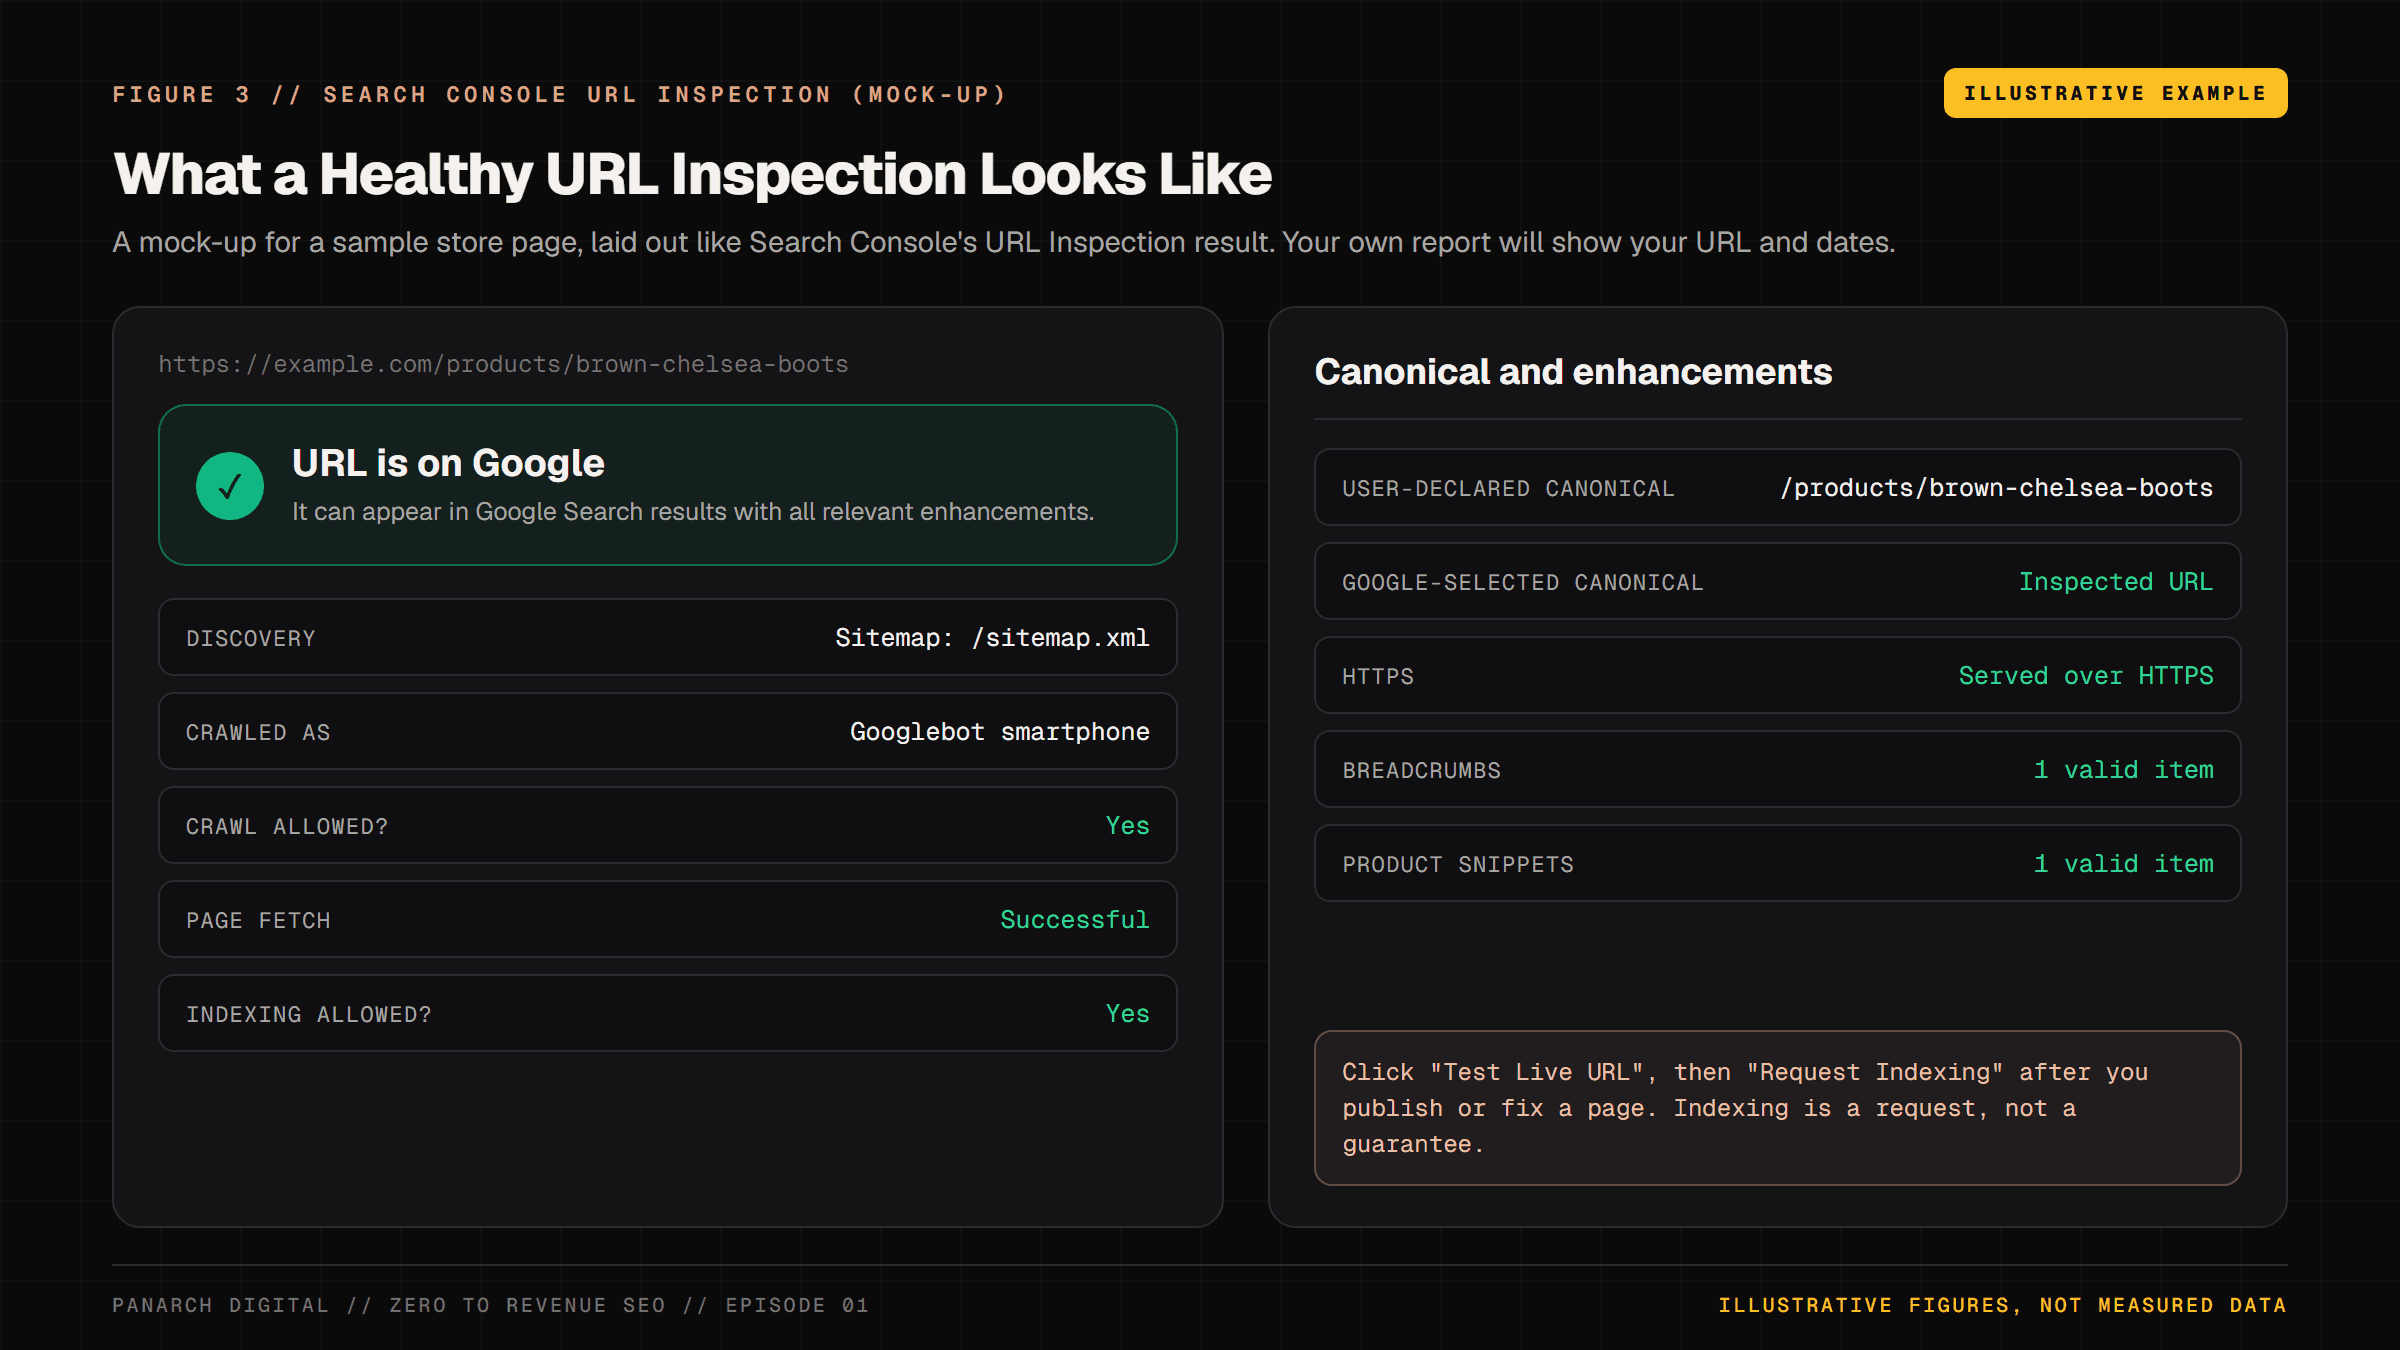
- Step 2.4: The 60-Second Indexing Request: Whenever you publish or fix an important page, copy its URL, paste it into the top search bar of GSC ('Inspect any URL'), and press Enter. Click 'Test Live URL'. If the test passes, click 'Request Indexing'. This asks Google to crawl the page soon. It is a request, not a guarantee, and there is a daily limit, so save it for pages that matter.
Stage 3: Engineering the Crawl Highway (Sitemaps & Robots)
Every website must provide two simple roadmap files for search engines: an XML Sitemap (a complete directory of every page you want indexed) and a robots.txt file (a guide telling crawlers which private pages to stay out of, like shopping carts or login screens).
If you are on Shopify or WordPress, these files are generated automatically. On Shopify, your sitemap lives at yourdomain.com/sitemap.xml. On WordPress, modern plugins generate yourdomain.com/sitemap_index.xml.
You don't need to touch any code.
If you are building a custom application in Next.js 16, you can add robots.ts and sitemap.ts files that rebuild both whenever new content is published. Never block /_next/ in robots.txt: it holds the JavaScript and CSS Google needs to render your pages.
Below is the production TypeScript implementation of app/robots.ts:
import type { MetadataRoute } from "next";

export default function robots(): MetadataRoute.Robots {
  const siteUrl = process.env.NEXT_PUBLIC_SITE_URL || "https://panarchdigital.com";
  return {
    rules: [
      {
        userAgent: "*",
        allow: "/",
        disallow: ["/api/", "/dashboard/", "/cart/", "/checkout/"],
      },
      {
        userAgent: ["GPTBot", "ChatGPT-User", "PerplexityBot", "ClaudeBot"],
        allow: ["/", "/blog/", "/definitions/"],
        disallow: ["/api/", "/dashboard/", "/cart/", "/checkout/"],
      },
    ],
    sitemap: `${siteUrl}/sitemap.xml`,
  };
}And below is the dynamic sitemap.ts handler, automatically extracting all static pages and published blog routes directly into a standard XML index:
import type { MetadataRoute } from "next";
import { publishedPosts } from "@/data/blog";

export default async function sitemap(): Promise<MetadataRoute.Sitemap> {
  const baseUrl = process.env.NEXT_PUBLIC_SITE_URL || "https://panarchdigital.com";
  const staticPaths = ["", "/about", "/services", "/pricing", "/blog", "/contact"];

  const staticRoutes: MetadataRoute.Sitemap = staticPaths.map((path) => ({
    url: `${baseUrl}${path}`,
  }));

  const blogRoutes: MetadataRoute.Sitemap = publishedPosts().map((post) => ({
    url: `${baseUrl}/blog/${post.slug}`,
    lastModified: post.updated || post.date,
  }));

  return [...staticRoutes, ...blogRoutes];
}Stage 4: Reverse-Engineering Buyer Intent (Zero-Cost Keyword Research)
You do not need to spend $200 a month on enterprise software subscriptions to find what your customers are searching for. Google gives you this commercial data completely free right on its homepage. Follow this 4-step research method:
- Step 4.1: The Google Autocomplete 'Alphabet' Method: Open an incognito browser window. Type your core service or product followed by the letter 'a' (e.g. 'leather boots a'). Look at the dropdown: Google will suggest 'ankle', 'arch support', 'all black'. Erase 'a' and type 'b' ('brown', 'brand', 'best'). These are not guesses; these are the actual queries real human beings are typing into Google right now.
- Step 4.2: Mine the 'People Also Ask' (PAA) Box: Search for your main product. Scroll down to the 'People Also Ask' box. Click open two or three questions. Google will dynamically load six more. Write these down. These are the exact comparison questions and objections your potential customers have before they buy.
- Step 4.3: Inspect 'Related Searches' at the Bottom of Page 1: Scroll to the very bottom of Google's search results. You will see 8 bold phrases under 'Related searches'. These represent the semantic entities that Google associates with your primary topic.
- Step 4.4: Discard Vanity Volume, Keep High-Intent Phrases: Ignore massive, generic 1-word terms like 'shoes' or 'marketing'. Target specific 3-to-5 word commercial phrases that indicate buying intent: [Action: Buy / Hire / Price] + [Specific Product: Goodyear welted Chelsea boots] + [Differentiator / Location: handcrafted / India / Delhi].
Stage 5: Crafting the High-Converting SERP Snippet
Your search snippet—consisting of your Title Tag and Meta Description—is the digital storefront window of your business. If your window is broken, empty, or cuts off halfway through, nobody clicks.
Here are the two formulas to use:
- The 50–60 Character Title Formula: [Target Keyword] - [Concrete Outcome / Proof] | [Brand Name]. Example: 'Bespoke Leather Boots - Handcrafted Goodyear Welt | Panarch' (59 characters). Google sets no fixed limit; it trims titles to fit the screen, so about 50–60 characters usually shows in full. Put the search phrase first so it survives any cut, and know that Google may still rewrite a title.
- The 155-Character Meta Description Formula: [Acknowledge Specific Customer Pain] + [State Concrete Solution] + [Direct Call to Action Hook]. Example: 'Tired of synthetic boots that crack after six months? Handcrafted full-grain leather boots with Goodyear welted resolable soles. Shop the collection today.' (155 characters). Google may show a different snippet if another passage on the page answers the search better.
- Where to Enter This (Zero-Code): On Shopify: Go to Products -> Select product -> Scroll to the 'Search engine listing' box -> Click the pencil (Edit) -> Paste your Title and Description -> Click Save! On WordPress: Open your post -> Scroll below content to Yoast or RankMath -> Click 'Edit snippet' -> Paste your Title and Description -> Click Update! On Webflow: Pages panel -> Click Gear icon next to page -> SEO Settings -> Paste Title and Description -> Click Save and Publish!
Stage 6: Automating Pre-Flight Audits with the CLI Wizard
To check that your website meets the crawlability, metadata and indexation requirements before deploying code, Panarch Digital built a free terminal tool: the SEO Pre-Flight Wizard.
It is open source under the MIT licence at github.com/Arpan-Tyagi/panarch-seo-wizards. You only need Node.js 18.17 or newer (free from nodejs.org); nothing else to install. Prefer not to use a terminal? Run the same checks with URL Inspection in Search Console and by opening /robots.txt and /sitemap.xml on your domain.
# Run it straight from GitHub (needs Node.js 18.17+):
npx --package=github:Arpan-Tyagi/panarch-seo-wizards \
  seo-wizard https://yourdomain.com

# In CI, fail the build below a score of 80:
npx --package=github:Arpan-Tyagi/panarch-seo-wizards \
seo-wizard https://yourdomain.com --fail-under 80The wizard runs a 30-second multi-stage probe: checking HTTPS and that every http/www variant redirects to one address, reading robots.txt (including blocked JavaScript or CSS folders), validating the XML sitemap, checking title, description, canonical and viewport tags, and making sure no accidental 'noindex' is left over from staging.
It prints a checklist score out of 100 with a fix list. The score is the tool's own checklist, not a Google ranking signal.
The Master SEO Tool Stack: Exactly What Tools to Use & How to Use Them (Free vs. Paid)
You do NOT need to pay ₹75,000 a month to an agency or subscribe to expensive $200/month toolkits.
Most of what you need to build an organic revenue engine is provided free by Google, your web browser, and open-source tools. Below is your complete, step-by-step tool stack:
- Tool 1: Google Search Console (GSC) [Cost: ₹0 / Official Google]: Concept: The official caller ID and private phone line between your website and Google's crawl engine. Step-by-Step SOP: (1) Go to search.google.com/search-console; (2) In the top bar ('Inspect any URL'), paste any page URL; (3) Click 'Test Live URL'; (4) Click 'Request Indexing' to ask Google to crawl it. Where to Edit & Save: Shopify: verify with a DNS TXT record (below), or paste the HTML tag into layout/theme.liquid after duplicating your theme as a backup. WordPress: Yoast SEO -> Settings -> Site connections (or Rank Math -> Webmaster Tools) -> Paste verification code -> Save. DNS: GoDaddy / Cloudflare -> Add TXT record on '@' -> Save. Where to Verify Success vs. Failure: Success: Green shield checkmark: 'URL is on Google'. 'Crawl allowed', 'Page fetch' and 'Indexing allowed' all read Yes or Successful. Failure: 'Discovered - currently not indexed' (Google knows the URL but has not crawled it yet, often because it expected to overload your server) or 'Crawled - currently not indexed' (Google read the page and chose not to index it for now). Fix: Make the page clearly useful and different from your other pages, and link to it from your homepage or a main category.
- Tool 2: Chrome DevTools 'View Page Source' Test [Cost: ₹0 / Free in Browser]: Concept: The x-ray machine that shows you exactly what Googlebot sees when it arrives at your website. Step-by-Step SOP: (1) Open your live webpage in Google Chrome; (2) Right-click anywhere on the page and select 'View Page Source' (Ctrl+U or Cmd+Option+U); (3) Press Ctrl+F and search for your primary headline or product title; (4) Search for 'noindex'. Where to Edit & Save: If you see '<meta name="robots" content="noindex">' or your text is completely missing from View Source: On Shopify: Check Online Store -> Preferences -> Turn off password protection. On WordPress: Check Settings -> Reading -> Uncheck 'Discourage search engines'. On Next.js: Check src/app/layout.tsx -> set 'robots: { index: true, follow: true }' and save. Where to Verify Success vs. Failure: Success: Your main headline appears in plain text in the page source code. Failure: The page source is completely blank or only shows '<div id="root"></div>' with no text inside, meaning your text is built by JavaScript in the browser and Google has to render the page before it sees anything.
- Tool 3: Google Search 'site:' Diagnostic [Cost: ₹0 / Free Web Query]: Concept: The 5-second public indexation check directly on Google's search engine. Step-by-Step SOP: (1) Open an incognito browser window; (2) In Google search, type 'site:yourdomain.com' (e.g. site:panarchdigital.com); (3) Inspect the list of results. Where to Edit & Save: If pages are missing or broken, edit your sitemap in Shopify Admin or WordPress and submit it in Google Search Console. Where to Verify Success vs. Failure: Success: Google displays all your core service and product URLs with clean titles and descriptions. Failure: 'Your search - site:yourdomain.com - did not match any documents.' This indicates a critical technical blocker. Check robots.txt and Search Console immediately.
- Tool 4: Google PageSpeed Insights & Core Web Vitals [Cost: ₹0 / Official Google]: Concept: Google's speed testing laboratory that measures whether your mobile visitors experience fast, responsive page loads. Step-by-Step SOP: (1) Go to pagespeed.web.dev; (2) Enter your webpage URL and click 'Analyze'; (3) Inspect the 'Mobile' tab score (0–100); (4) Check the Core Web Vitals assessment: Largest Contentful Paint (LCP < 2.5s), Interaction to Next Paint (INP < 200ms), Cumulative Layout Shift (CLS < 0.1). Where to Edit & Save: Shopify: Delete unused apps from Admin -> Apps. Compress heavy banner images using TinyPNG or WebP format. WordPress: Install one caching plugin (LiteSpeed Cache is free; WP Rocket is paid) and remove bulky plugins. Next.js: Give the hero image the preload prop, <Image preload /> in Next.js 16 (older versions call it priority), and serve pages from a CDN. Where to Verify Success vs. Failure: Success: All three Core Web Vitals bars are green with 'Core Web Vitals Assessment: Passed'. Mobile performance score > 90. Failure: Red warning with LCP over 4s or INP over 500ms (Google's 'poor' thresholds). Visitors are leaving before your page even finishes rendering.
- Tool 5: The Panarch SEO Pre-Flight Wizard [Cost: ₹0 / Open source, MIT]: Concept: A terminal scanner that tests HTTPS and redirects, robots.txt, sitemaps, metadata and noindex tags in about 30 seconds. Step-by-Step SOP: (1) Install Node.js 18.17 or newer from nodejs.org; (2) Open a terminal; (3) Run: 'npx --package=github:Arpan-Tyagi/panarch-seo-wizards seo-wizard https://yourdomain.com'; (4) Read the fix list. Where to Edit & Save: The code is on GitHub (github.com/Arpan-Tyagi/panarch-seo-wizards); fork it to change the rules, and add --fail-under 80 to run it as a check in your GitHub Actions deployment. Where to Verify Success vs. Failure: Success: Green PASS lines and few or no fixes listed. Failure: A red FAIL line, for example robots.txt blocking the whole site with Disallow: /, followed by the exact fix.
Search Intent vs. Search Volume: The Cash Register Velocity Matrix
One of the most dangerous metrics sold by traditional SEO agencies is 'Search Volume'. Agencies boast about ranking for a keyword with 250,000 searches a month.
But if those searches come from bored teenagers doing homework or people looking for free pictures, almost none of them buy, and your revenue barely moves.
Search intent governs commercial velocity. Below is an illustrative example that does the maths for one specific buying query and one broad vanity query:
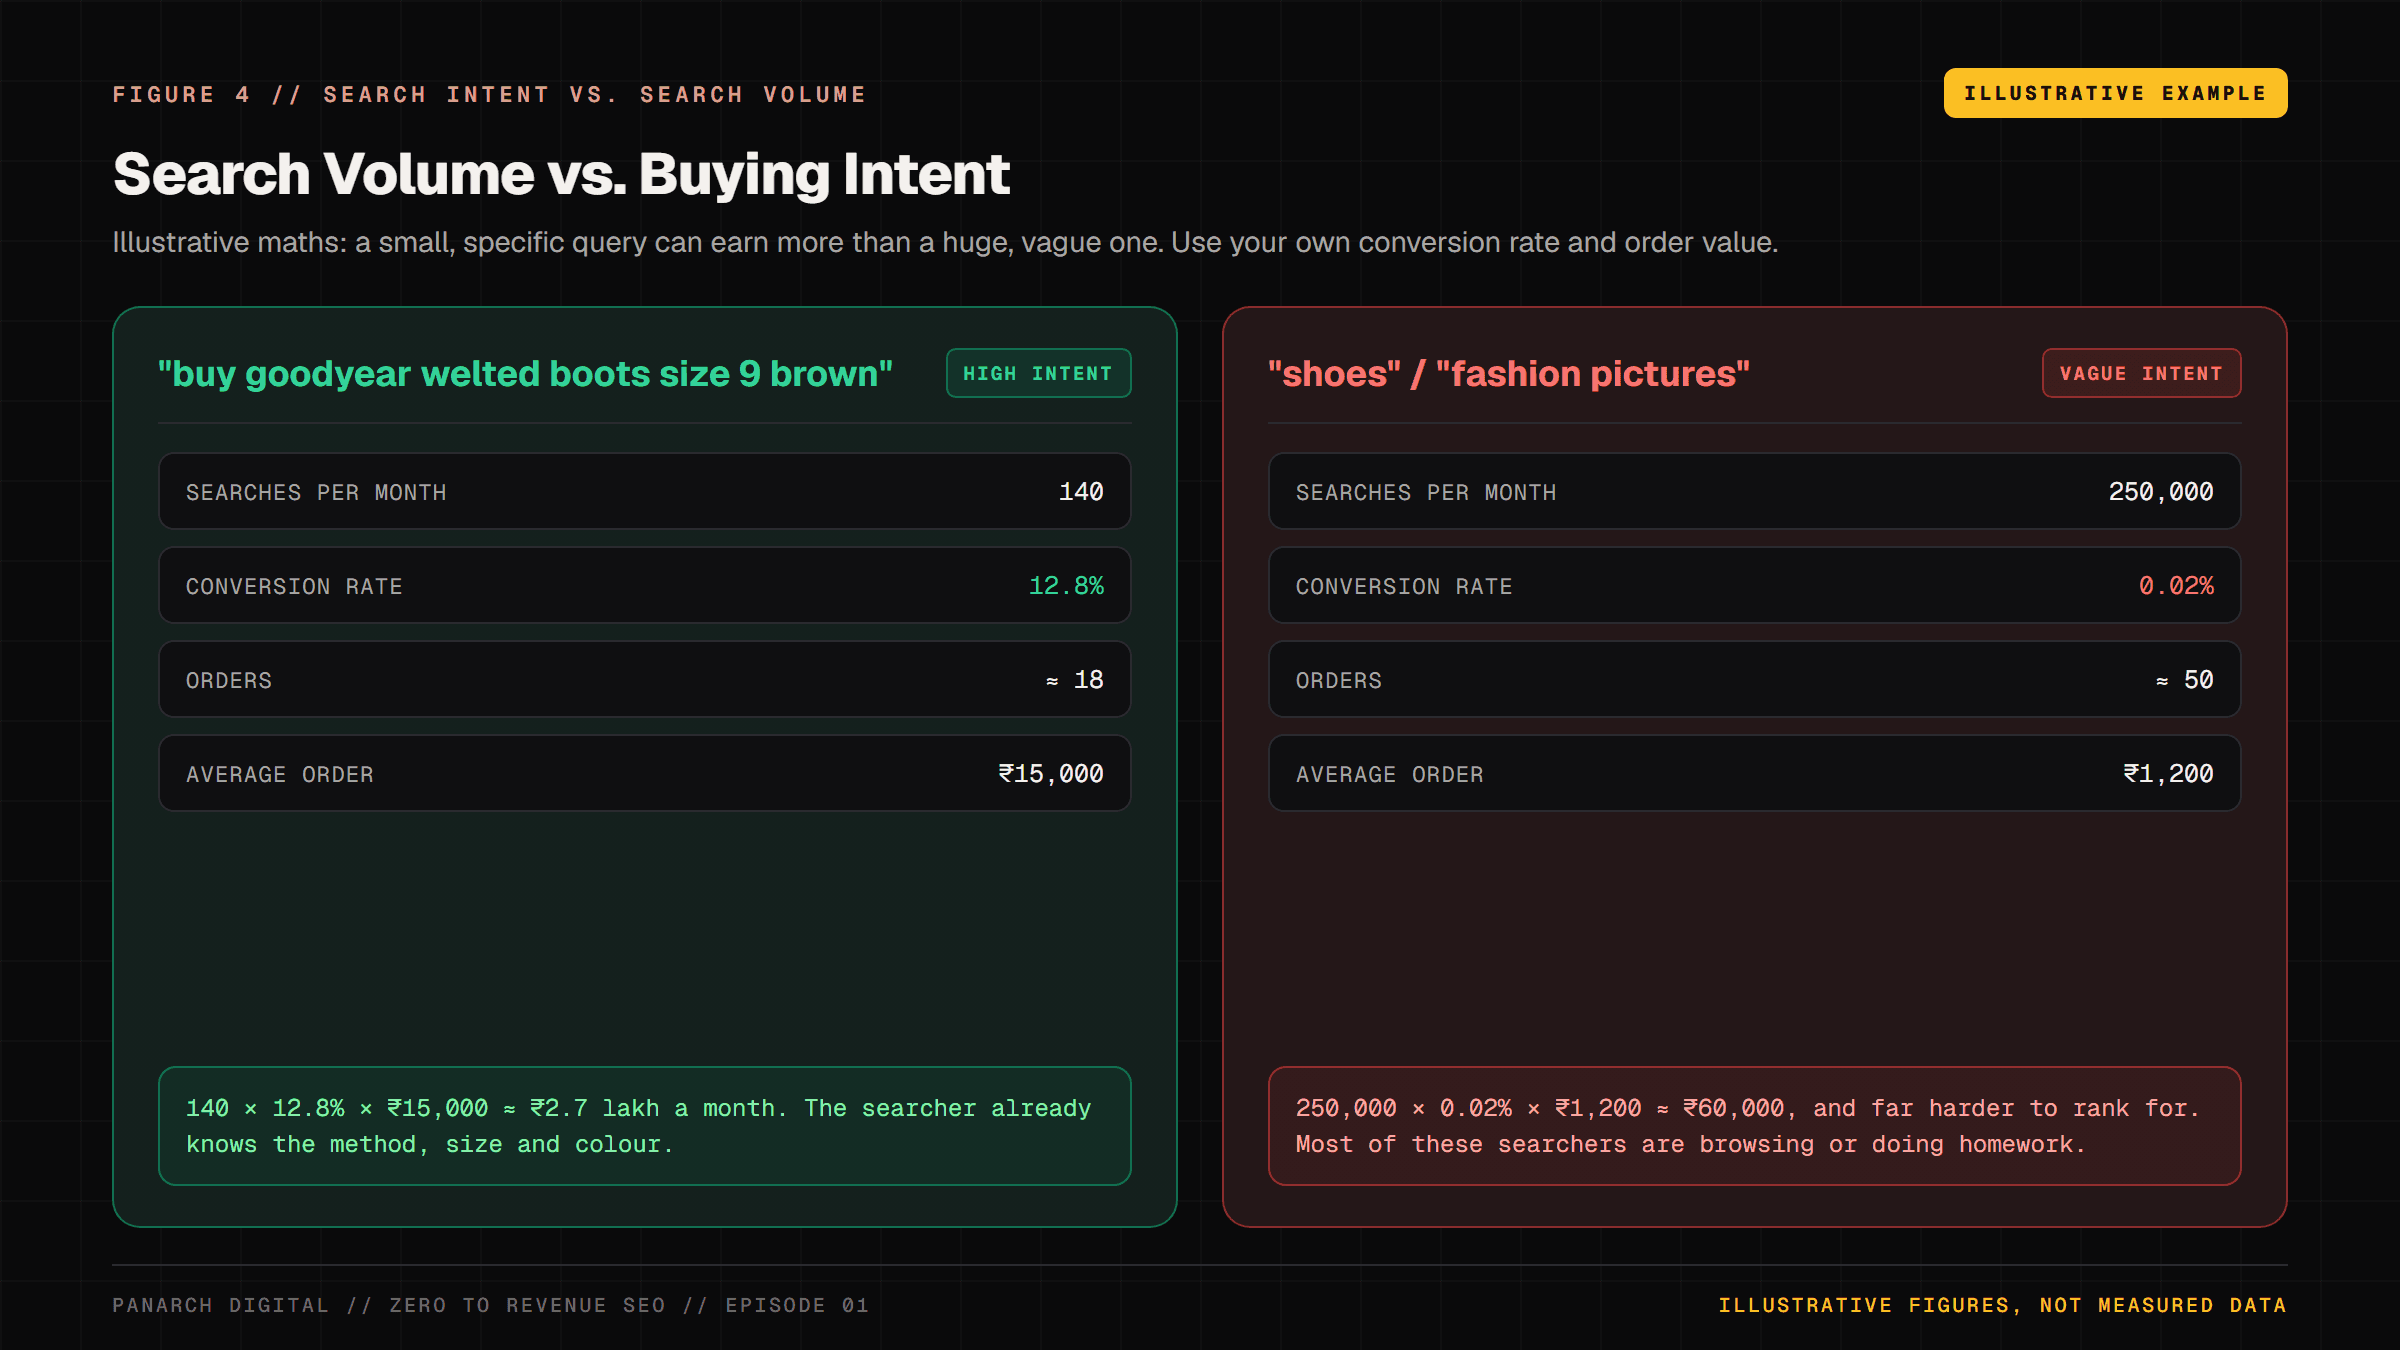
Now look at the specific query: 'buy goodyear welted boots size 9 brown'. Search volume in this example? 140 searches a month.
But analyze the psychological profile of the human being typing those characters: They know the manufacturing method (Goodyear welted). They know the silhouette (boots). They know the exact shoe size (9). They know the color (brown).
They are sitting on their sofa with their credit card in hand or UPI app unlocked. They are actively trying to solve an immediate commercial problem.
Specific, ready-to-buy searches usually convert far better than broad ones. Check it on your own store: in GA4, compare conversion rate by landing page, and in Search Console's Performance report, see which queries bring visitors to the pages that sell.
The 30-Second Reality Check: Live Diagnostic Commands Anyone Can Run Right Now
You do not need an enterprise software subscription to determine whether your website is healthy or broken. Below is our 30-second triage protocol you can execute in your web browser right now:
The Panarch Digital Zero-to-Revenue Launch Checklist (Notion Template)
To help founders, marketing directors, and engineering teams execute this framework without missing a step, Panarch Digital is turning this pre-flight audit into a free Notion checklist. It is being published now; until it is live, the four phases below are the checklist.
The checklist is divided into four chronological phases:
- Phase 1: Technical & Crawl Verification (Validating robots.txt, edge sitemaps, SSL certificates, mobile viewport meta tags, and eliminating accidental noindex flags).
- Phase 2: Intent & Keyword Architecture (Mapping transactional and commercial keywords to dedicated landing pages, establishing topic clusters, and eliminating keyword cannibalization).
- Phase 3: Core Web Vitals & Performance Baseline (Benchmarking real-user INP < 200ms, LCP < 2.5s, CLS < 0.1, and implementing AVIF image compression).
- Phase 4: Entity Schema & Knowledge Graph Setup (Cross-linking Organization, Founder, LocalBusiness, and Service entities using canonical @id URI nodes).
When the Notion template is live, the link will appear on the course resources hub at panarchdigital.com/resources.
Sovereign Engineering: How Panarch Digital Solves Organic Growth
Panarch Digital does not sell monthly PDF reports or cosmetic meta-tag retainers.
We partner with ambitious D2C brands, B2B enterprises, and high-growth founders to replace fragile third-party dependencies with custom, sovereign web infrastructure.
We engineer ultra-fast Next.js storefronts, automated programmatic SEO engines, and verifiable Core Web Vitals performance that turns organic search into your most profitable revenue channel.
If you are ready to stop renting your customers and start owning compounding digital equity, review our technical practices or schedule an engineering architecture audit with our team:
- Explore our Technical SEO & Core Web Vitals Practice (/services/seo)
- Inspect our High-Performance Headless Web Development Services (/services/web-dev)
- Benchmark your storefront against our real-time performance baseline (/performance-baseline)
Frequently asked
Why is my new website not showing up on Google search?
New websites face three primary hurdles: Googlebot has not yet discovered any inbound links to the domain, the site is missing an XML sitemap submitted in Google Search Console, or a technical blocker (such as a rogue 'noindex' tag, password-protected staging mode, or restrictive robots.txt disallow rule) is actively preventing Googlebot from cataloging the pages.
How long does it take for SEO to generate commercial sales?
Google's own guidance says SEO work usually takes four months to a year before you see the full benefit. Specific, low-competition buying queries on a technically sound site can start bringing sales sooner; broad, competitive keywords take the longest.
Are paid SEO tools like Ahrefs or Semrush strictly necessary to rank?
No. While paid tools provide valuable competitor intelligence and backlink data, Google Search Console, Chrome DevTools, Google's autocomplete, and Google's free Rich Results testing suite provide most of the data a growing business needs to rank.
What is the difference between crawling, indexing, and ranking?
Crawling is the physical discovery process where Googlebot follows links across the web. Indexing is the parsing and storage of that discovered content in Google's searchable database. Ranking is the algorithmic scoring process that determines where that indexed content appears on the results page.
Sources
- Google Search Central: How Google Search Works (Crawl, Index, Serve)
- Google Search Central: Robots.txt Specifications & Directives
- web.dev: Web Vitals
- Google Search Central: Understand the JavaScript SEO basics
- Google Search Central: Do you need an SEO?
- Google Search Central: Spam policies for Google web search
- Search Console Help: Disavow links to your site
- Search Console Help: Page indexing report
Related